Everyone and their pandemic puppy has started a podcast, and Zoom—despite being about as purpose-built for podcasting as an abacus is for filing taxes—has become a go-to platform for remote recording.
While I’m not a podcaster myself (my talents lie more in binge-watching Seinfeld and burning toast), one of my good friends hosts a moderately successful pop culture podcast that she records via Zoom. I picked her brain to bring you the ultimate guide on how to record a podcast on Zoom.
Table of contents:
6 easy steps to record a podcast on Zoom
Before we dive in, let me be clear: recording a podcast on Zoom without tweaking any settings is kind of like using pruning shears to open a jar of pickles. Can you do it? Sure. Should you? Well, that depends on how desperately you want those pickles. But since we’re here, let’s make sure you’re using those pruning shears with the utmost precision.
Step 1. Set up a Zoom account
The first step in your journey to podcast stardom is setting up a Zoom account.
-
Head to the Zoom website and sign up for an account if you don’t already have one. (Though, at this point, finding someone without a Zoom account is like finding someone who’s never seen a “Star Wars” movie—they exist, but they’re weird and probably shouldn’t be trusted.)
-
Download and install the Zoom desktop client.
Like most things that claim to be free, the free Zoom plan comes with a catch: it limits meetings to 40 minutes. If your podcast episodes typically run longer than that, you’re either going to need to upgrade to a paid plan or get really good at speaking like an auctioneer.
The Pro plan removes the time limit and adds other useful features like cloud recording storage. But if you’re not ready to shell out for a paid Zoom account, there is a workaround:
-
Record in 40-minute increments. When the meeting times out, you can use it as a chance to stretch or grab a sip of water.
-
Restart the meeting and pick up where you left off.
-
You’ll get separate recordings for each session, which you can stitch together during editing.
Yes, it’s a bit clunky, but it gets the job done without costing you a dime.
Step 2. Optimize Zoom settings
Zoom’s default settings are optimized for business meetings, not to capture your dulcet tones as you wax poetic about true crime. Let’s adjust these settings so your podcast doesn’t sound like it was recorded through a drive-thru intercom.
-
With the Zoom app open, navigate to Settings by clicking the cog icon in the top-right corner.
-
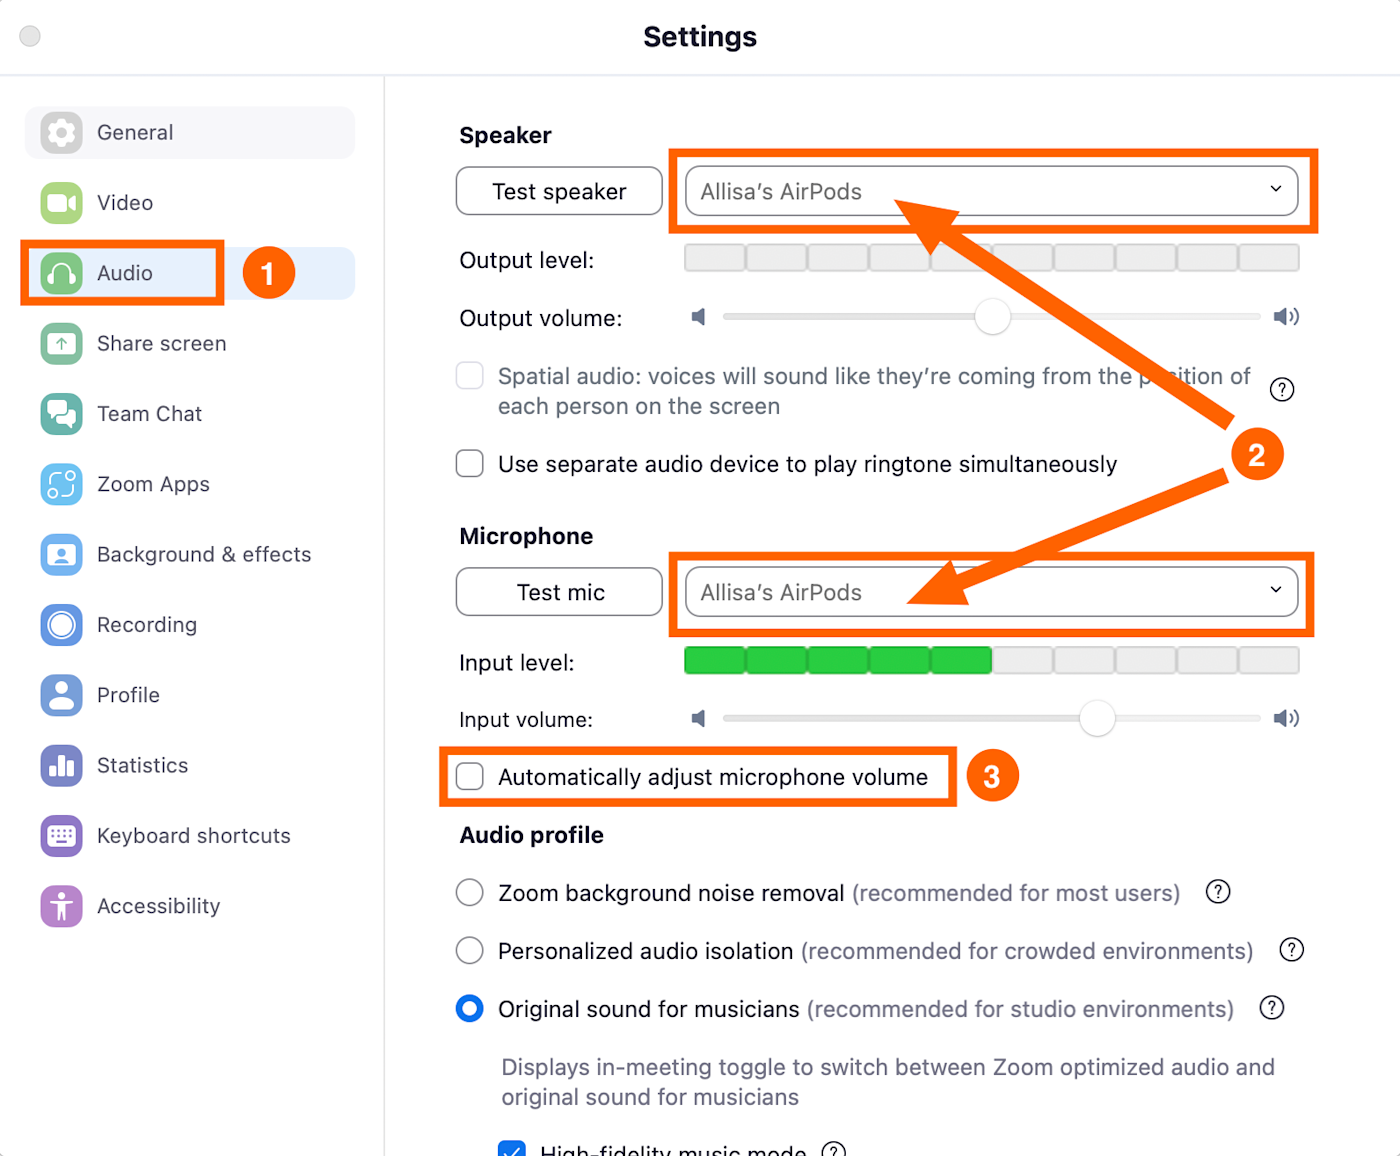
Head to the Audio tab, and select the speaker and microphone you plan on using from the dropdown menus.
-
Untick Automatically adjust microphone volume to prevent Zoom from dynamically altering your volume.
-
Manually adjust the microphone volume to a level where the Input level meter reaches about three-quarters of the way up. Click Test mic to confirm your microphone is working properly.
-
A bit further down the page, select Original sound for musicians. This prevents Zoom from applying its default audio processing and compression, which can make your podcast sound like, well, a Zoom call.
Check High-fidelity music mode for the best possible audio quality.
Uncheck Echo cancellation to prevent interference with your audio processing.
Check Stereo audio to enable stereo sound for a better listening experience.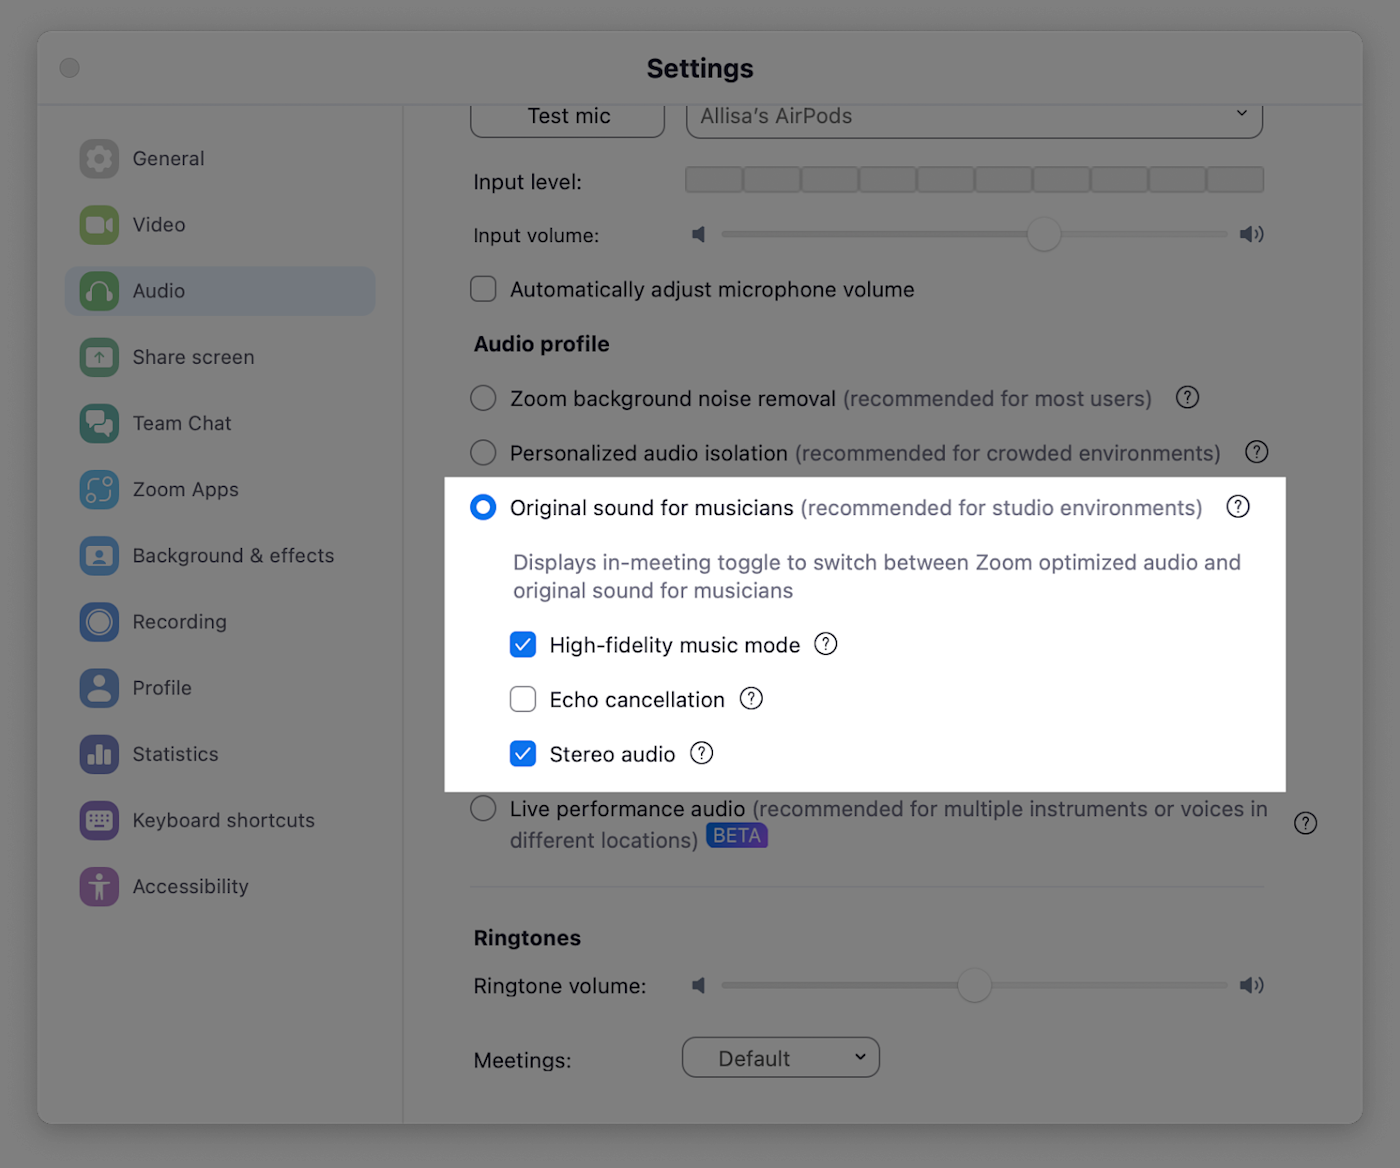
-
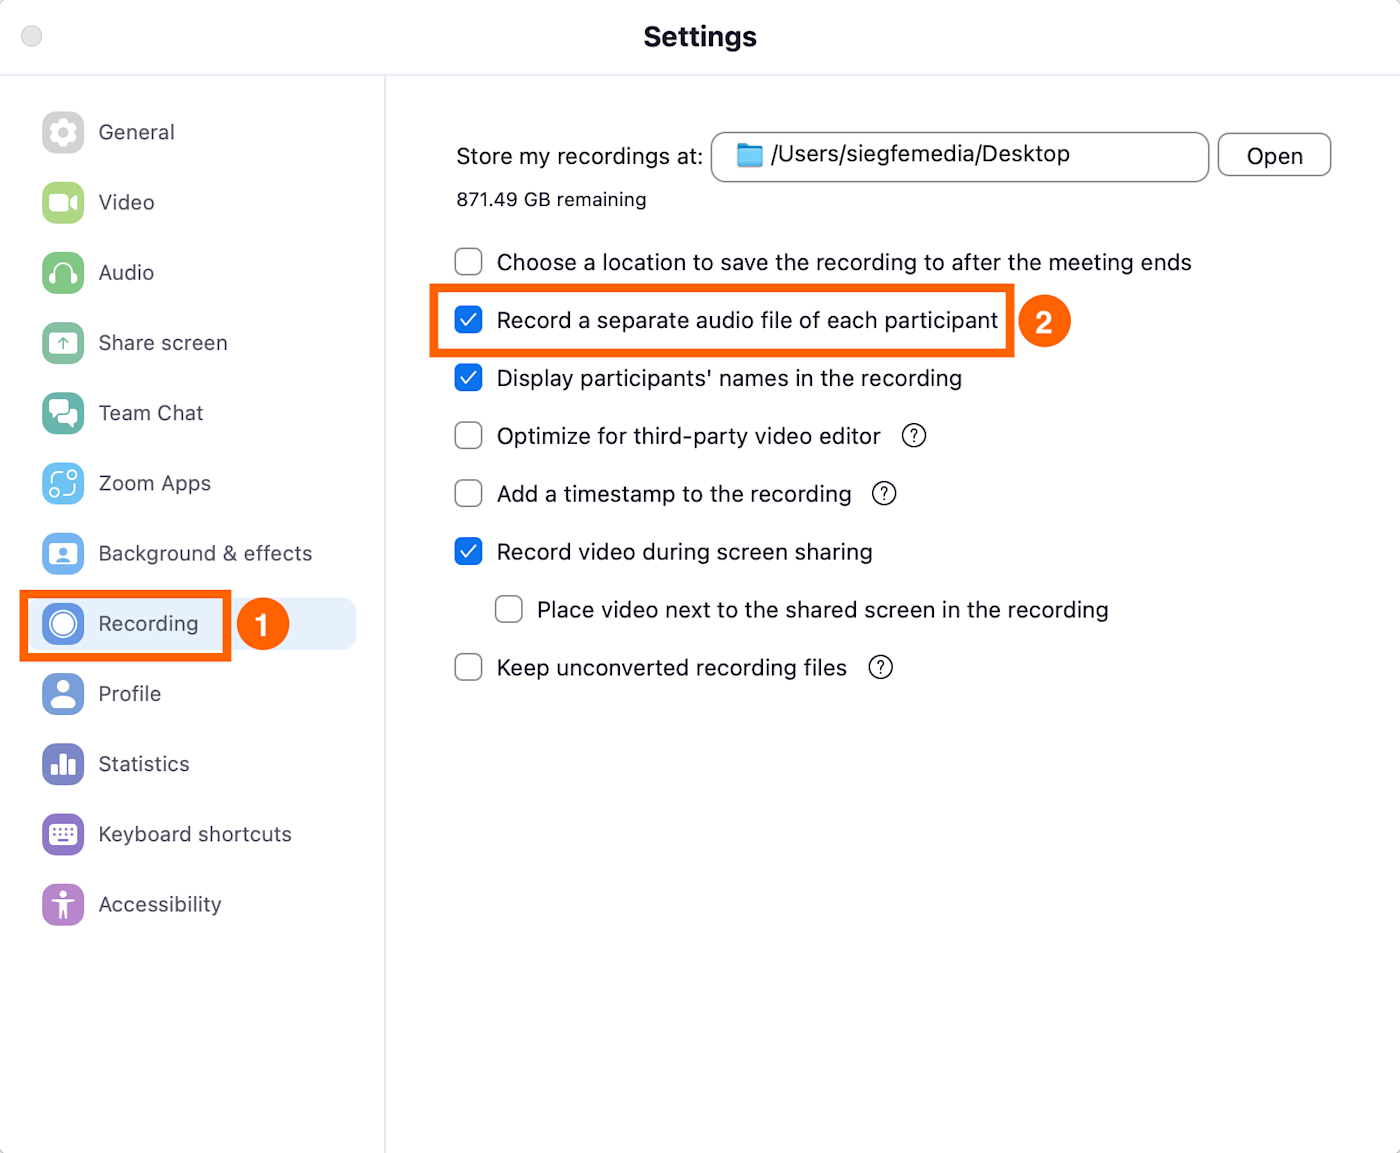
Navigate to the Recording tab, and enable Record a separate audio file of each participant. This step is optional, but I highly recommend it, as it allows you to adjust individual speakers’ volumes and remove background noise separately. No one wants to listen to a podcast that sounds like a bizarre mix of whisper-quiet ASMR and someone screaming into a megaphone at a protest rally.
Lastly, if you’re a paid user, you can choose between local recording (saves directly to your computer) or cloud recording. I personally prefer local recording since it typically results in better quality.
Here’s how to configure your Zoom recording settings:
-
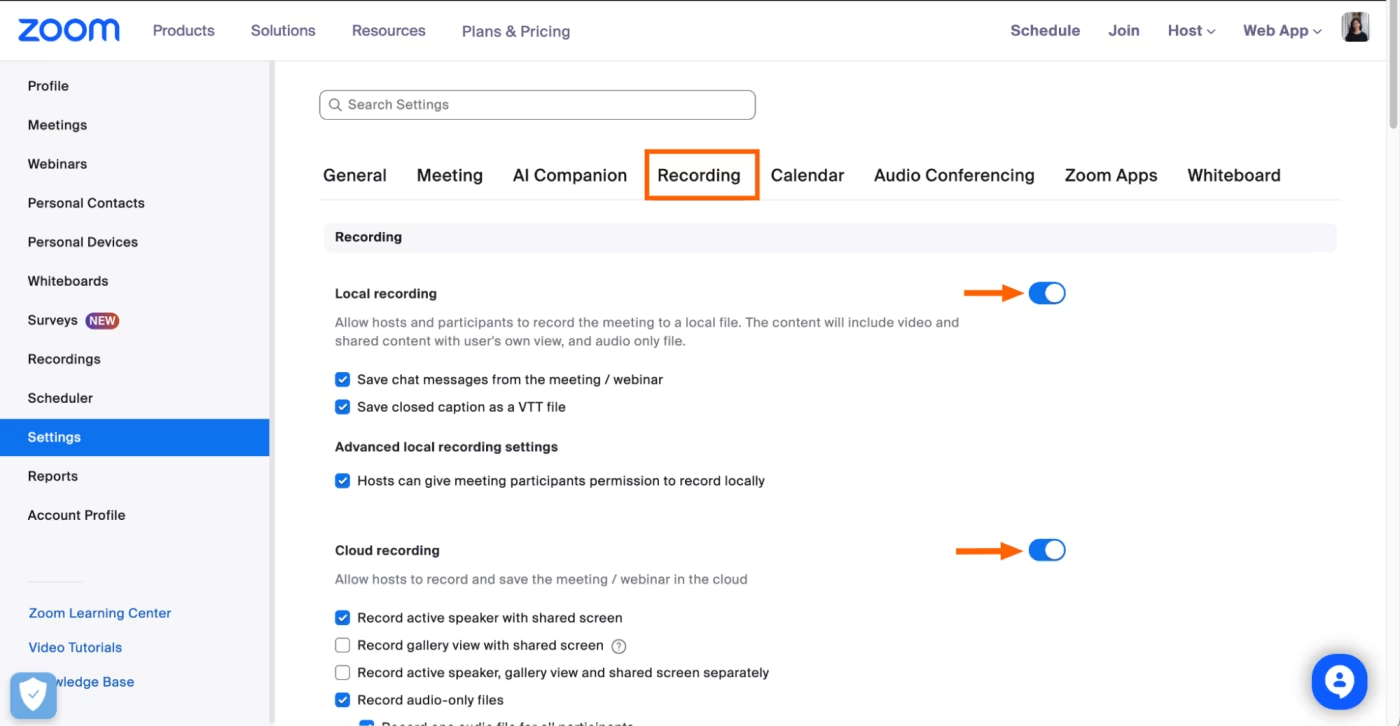
Log in to the Zoom web portal and click Settings on the left-hand side, then Recording.
-
Enable or disable Local recording and Cloud recording by clicking the toggle next to each setting.
Note: if you don’t see the option to edit recording settings, your account administrator has likely limited access to this feature.
Step 3. Set up a meeting
Once your settings are optimized, scheduling your podcast recording session is pretty straightforward.
-
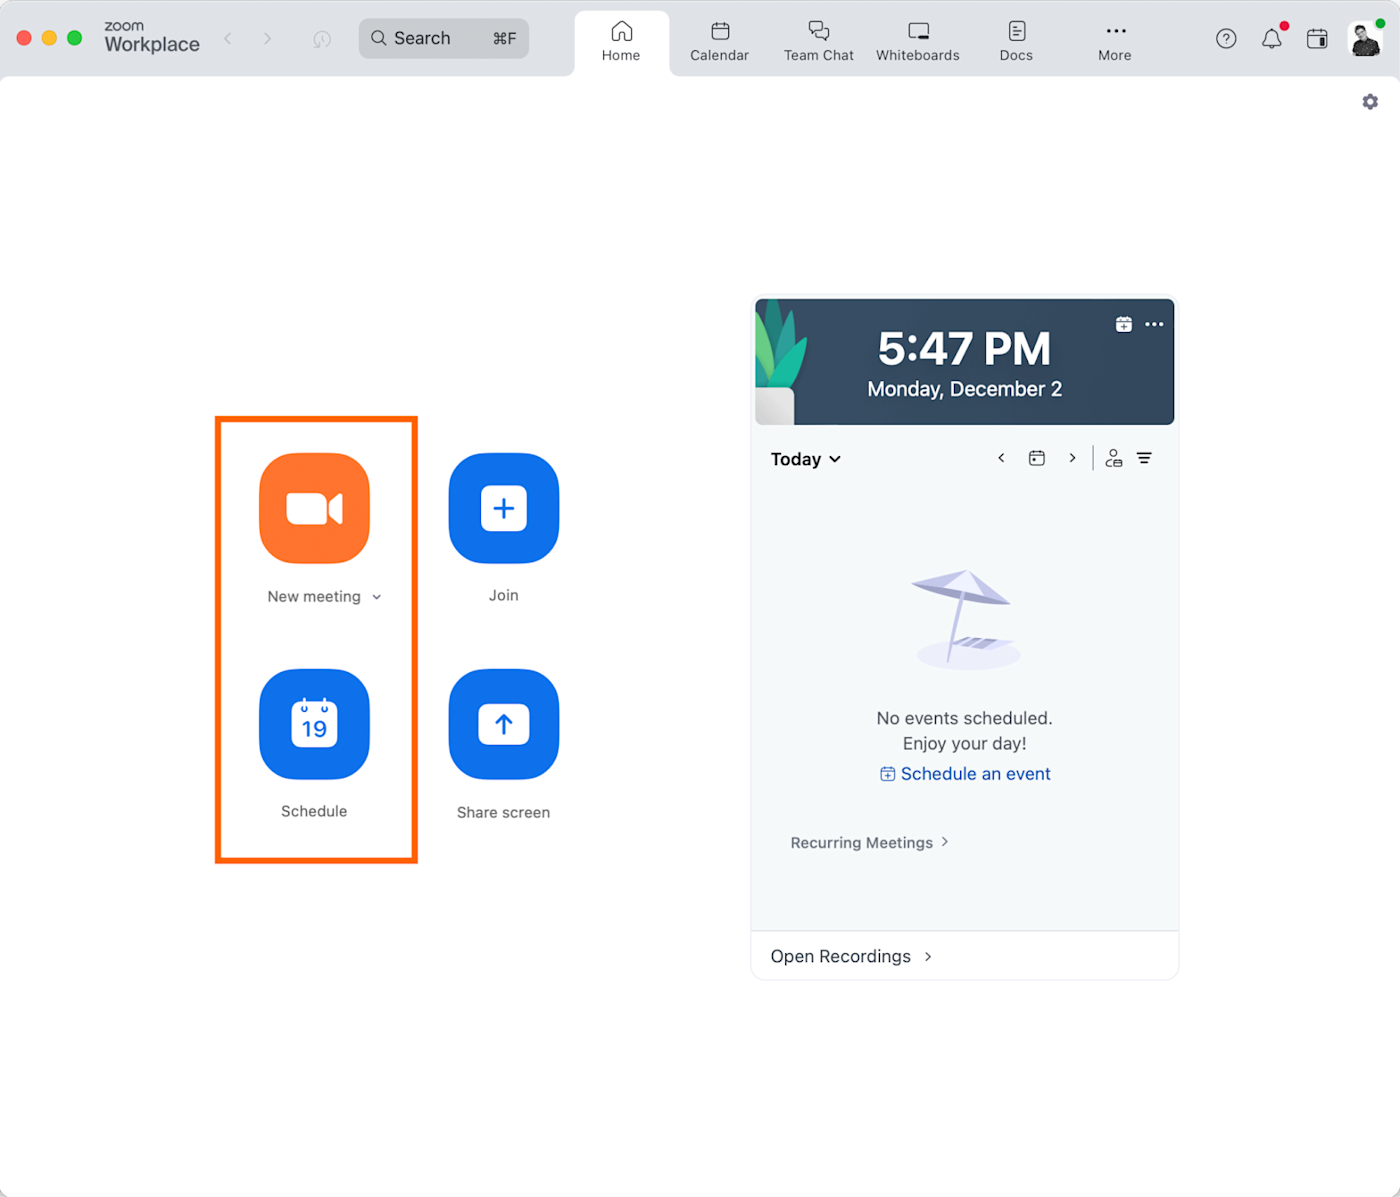
If you’re one of those spontaneous types who like to live dangerously, hit New meeting to open a Zoom meeting room. If you’re a responsible adult (boring), click Schedule instead to schedule one in advance.
-
Copy the meeting link to share with your guest(s).
Tip: Send this link well in advance, along with any prep materials or topics you plan to discuss. This gives your guests time to check their own setup and ensure they have the latest version of Zoom installed.
Step 4. Record your podcast
Now comes the moment of truth—actually recording your podcast. This is where things either come together beautifully or, much like the Falcons in Super Bowl LI, spectacularly fall apart.
-
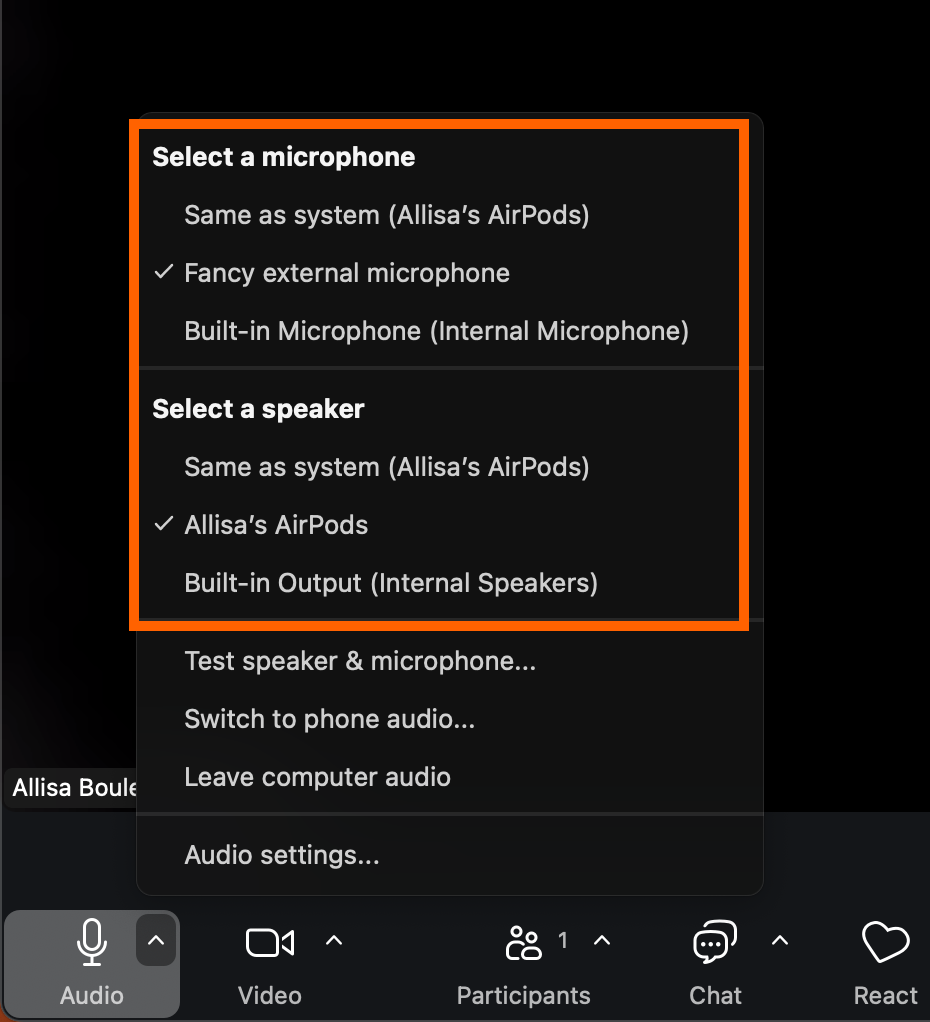
In the Zoom meeting window, click the ^ arrow next to the Audio icon.
-
Verify that the microphone and speaker (or headphones ) you want to use for recording are selected.
-
Do a quick sound check with each participant. Have everyone speak for a few seconds to check audio levels.
-
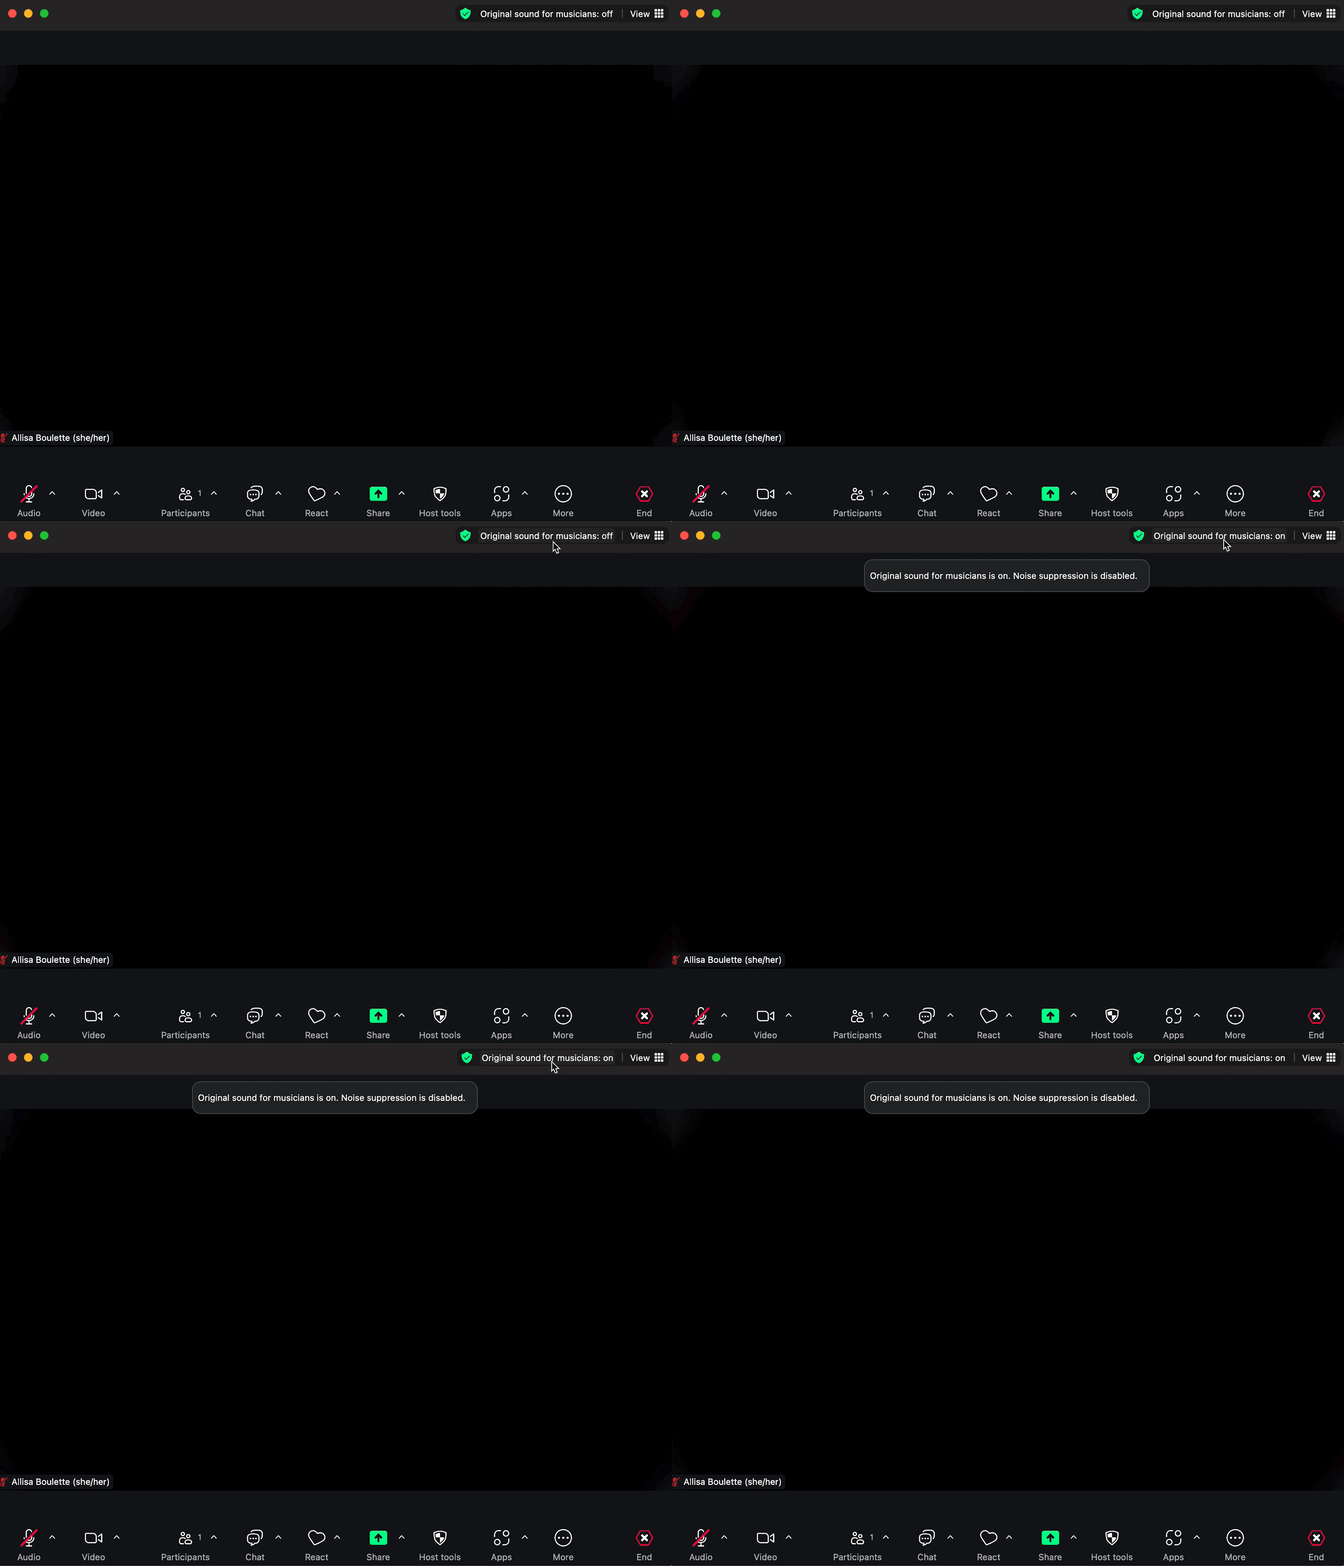
Look for the words Original sound for musicians: off in the top-right corner of your Zoom window. Click it so it turns on. Marvel at how nothing visibly changes, yet now you won’t sound like you’re broadcasting from the bottom of a well. (Make sure every participant enables this.)
-
Once everyone’s ready, click Record at the bottom of the window to record the Zoom meeting. If you don’t see it, click the More button to access additional options.
During the recording session, keep an eye on those audio levels, and ask participants to mute when they’re not speaking. This prevents background noise from creeping in. You can always use the chat feature to communicate (or hand signals like a third-base coach).
Step 5. End meeting and locate recording
Eventually, all good things must come to an end, including your podcast recording. Unless you’re going for some kind of endurance record, in which case, you might want to check if you’re legally required to register as a public nuisance.
-
When you’re done sharing your wisdom with the world (or running out of things to say, whichever comes first), click Stop Recording.
-
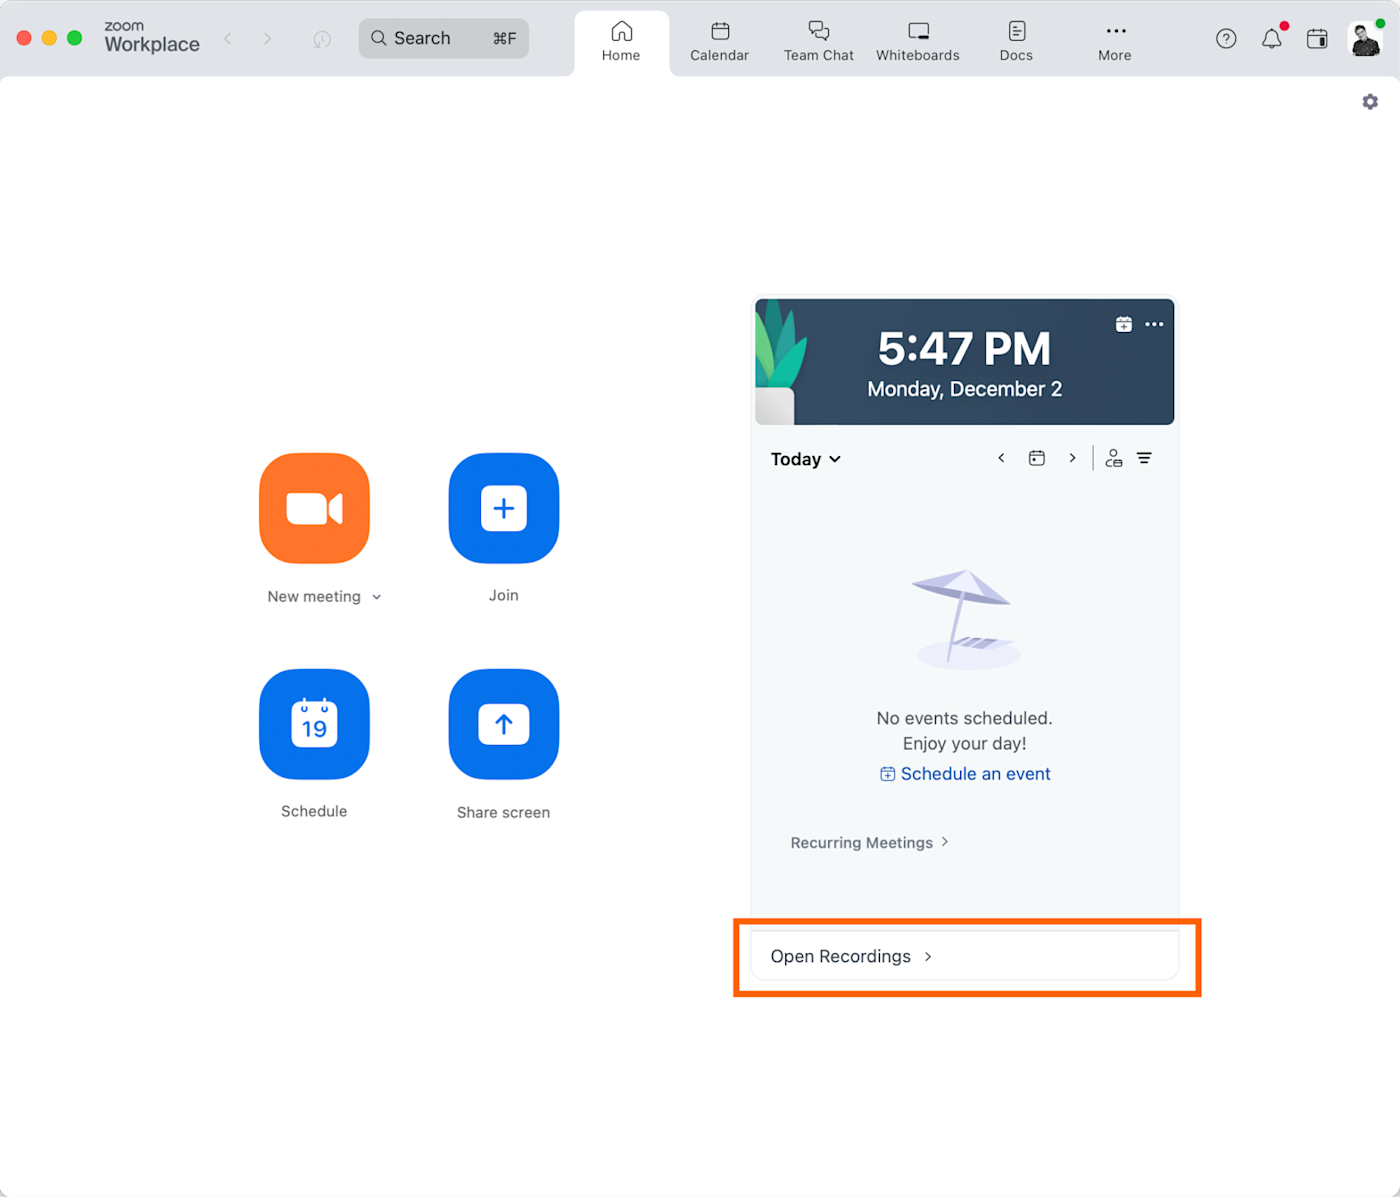
After the meeting, wait for Zoom to convert the recording. Once it’s done, you’ll be able to access it on the home screen of the Zoom desktop app.
-
Select Open Recordings below the calendar side panel and a new window will appear showing available Zoom recordings.
You’ll get a few files out of this whole ordeal:
-
Audio (.m4a) if you enabled separate audio tracks, so each participant will have an individual file
-
Video (.mp4) if video recording was enabled
-
Chat transcript (.txt) if the chat feature was used
Step 6. Edit and finalize
The final step is turning your raw recording into a polished podcast episode.
-
Import your audio files into your preferred editing software. (If you recorded separate audio files for each person in Zoom, import all of them into your project. This gives you more flexibility over individual volumes and editing.) Popular options include:
-
Audacity: A very popular free, open source audio editor; powerful but can have a bit of a learning curve
-
GarageBand: Free for Mac users and surprisingly capable for both basic and intermediate editing
-
Adobe Audition: Industry standard with advanced features; great if you’re serious about audio
-
Descript: Innovative platform that allows you to edit audio by changing or deleting words in the transcript
-
-
Clean up the audio. Use tools to trim out mistakes, dead air, or technical issues.
-
Use compression and normalization to make sure the volume is consistent throughout and even out loud and quiet parts.
-
Insert music or sound effects for finishing touches. A well-placed DJ airhorn can really liven things up.
-
Export your final file in a format acceptable to podcast hosting platforms (usually MP3 at 128kbps).
Tips for podcast recording on Zoom
I’ve compiled these essential tips for recording podcasts on Zoom based on my podcaster friend’s experience and my research.
-
Use an external microphone: Even a basic USB mic will make you sound approximately 1,000% better than your laptop’s built-in mic.
-
Wear headphones: Encourage all participants to wear headphones to prevent feedback and echo. It doesn’t matter if they’re $500 studio monitors or the free earbuds that came with your iPhone 6.
-
Use a wired connection: If possible, plug directly into your router. If you must use Wi-Fi, at least sit closer to your router (and maybe ask your roommate to lay off the anime torrenting during your recording session).
-
Record locally when possible: Choose local recording over cloud recording for better quality and reliability.
-
Have a backup recording plan: Consider using a secondary recording device like your phone’s voice recorder—Murphy’s Law is real, and it’s coming for your podcast.
-
Choose a quiet environment: No one wants to listen to a podcast that sounds like it was recorded on a helicopter (even if the podcast is a behind-the-scenes look into helicopter dates on reality TV dating shows).
-
Close unnecessary programs: This reduces the load on your computer and prevents unexpected notifications or sounds.
Zoom alternatives for podcasters
I love Zoom like I love fast food—it’s convenient, and it gets the job done, but it’s not exactly gourmet. If you’re serious about podcasting, consider these purpose-built alternatives.
-
SquadCast by Descript: A browser-based platform that combines recording and editing in one platform, with some impressive AI-powered features for cleaning up audio
-
Riverside.fm: Another browser-based option that captures recordings at the source for better reliability and individual track control—plus, it does 4K video if you’re one of those “visual podcast” people.
-
Zencastr: Beginner-friendly platform with a surprisingly capable free tier (though the name makes it sound like a startup that sells energy crystals to tech bros)
-
Podcastle: Feature-rich software with a user-friendly interface and AI-powered tools like noise cancellation and transcription
-
Waveroom: Collaborative app that allows for live editing and mixing during the recording session, ideal for real-time podcast production
Automate your Zoom podcast with Zapier
One of the most time-consuming aspects of podcasting is managing all the moving pieces—scheduling recordings, following up with guests, distributing episodes, and more. So why not consider using Zapier to automate some of the more tedious tasks?
With Zapier, you can automatically upload your Zoom recordings to your cloud storage provider, create calendar events for your next recording session, or track podcast-related tasks in your project management software of choice. Learn more about how to automate Zoom, or try one of these pre-made workflows.
Zapier is the leader in workflow automation—integrating with thousands of apps from partners like Google, Salesforce, and Microsoft. Use interfaces, data tables, and logic to build secure, automated systems for your business-critical workflows across your organization’s technology stack. Learn more.
Zoom podcast FAQs
In case you’re still sitting there with questions, here are answers to some of the most common head-scratchers about recording podcasts with Zoom.
Can I record only audio on Zoom?
Only paid Zoom users with cloud recording privileges can directly record audio-only files. To do this, you need to:
-
Log in to the Zoom web portal and go to Settings.
-
Select Recording and then Cloud Recording.
-
Tick the box next to Record an audio-only file.
Zoom will capture just the audio, saving both storage space and the need to look presentable.
How can I improve audio quality for my podcast on Zoom?
Besides the obvious answer of “don’t use Zoom” (I kid, I kid), here’s what actually works:
-
Use an external microphone and headphones (I will die on this hill).
-
Enable Original sound for musicians.
-
Record separate audio tracks for each participant.
-
Use a wired internet connection.
-
Record in a quiet environment with minimal echo.
Is Zoom good for professional podcast recording?
Zoom is fine for getting started or for casual podcasts, but if you’re trying to create the next Serial, you might want to invest in dedicated podcasting software, like Adobe Audition or Riverside.fm. That said, I’ve heard some decent podcasts recorded on Zoom—it’s all about how you use it and your willingness to work around its limitations.
Related reading: