So, you’ve found yourself in a Zoom breakout room with colleagues you’ve never spoken with, a clueless host, and no direction on how to proceed. Par for the course.
In theory, Zoom breakout rooms allow you to facilitate small group discussions and collaboration within meetings, improving engagement—but only if they’re done correctly.
Here, I’ll walk you through how to create and manage breakout rooms in Zoom and provide some pro tips to keep participants from pretending their Wi-Fi went down mid-meeting.
Creating breakout rooms in Zoom
You can create breakout rooms in Zoom both before and during a meeting, but I recommend doing so beforehand to avoid mid-meeting mishaps.
Before moving forward, make sure you have Zoom updated to the minimum version required or higher.
Step 1: Enable breakout rooms
You first have to enable the breakout room feature, if it isn’t enabled already. Here’s how:
-
Log in to your Zoom account via the online web portal.
-
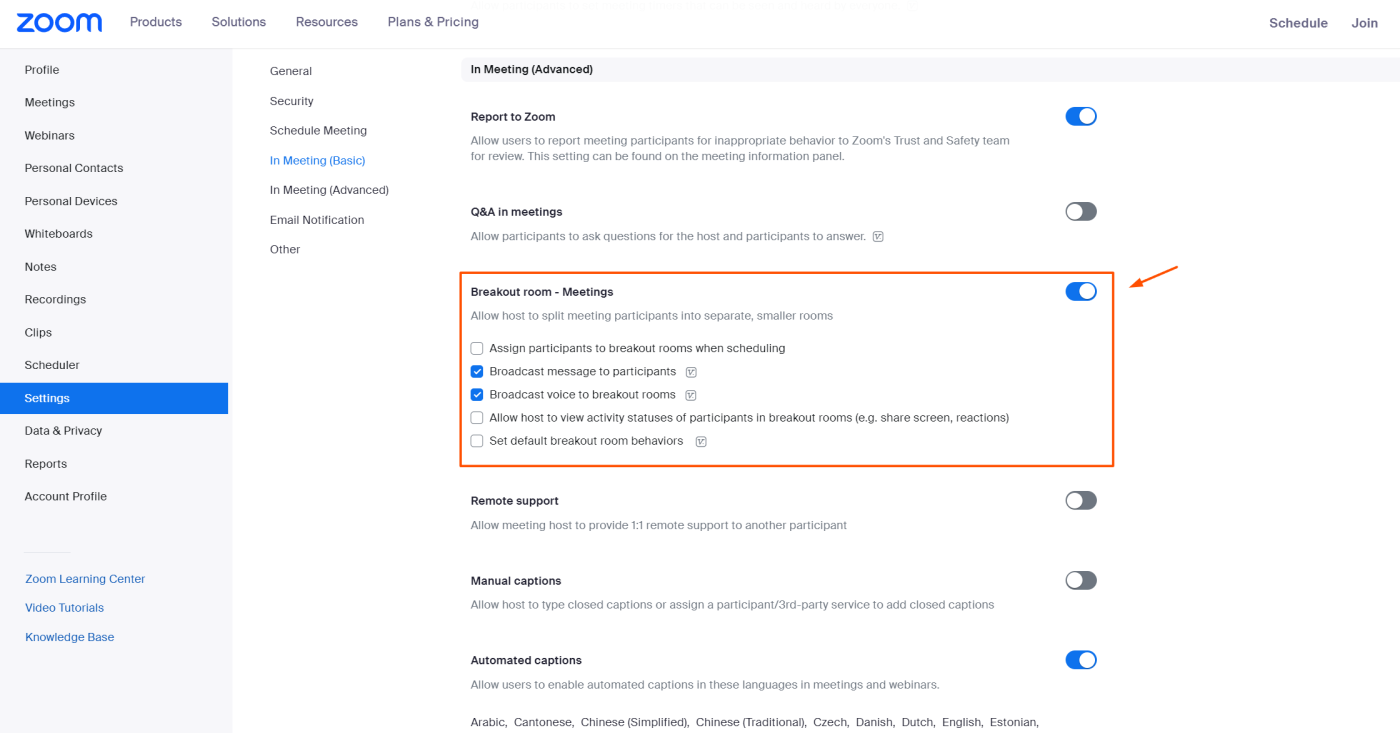
Click Settings on the left-hand menu, and scroll down to the In Meeting (Advanced) section.
-
Look for the Breakout Room – Meetings option, and toggle it on.
Step 2: Pre-assign participants (recommended)
While this step is technically optional, to me it’s essential to avoid wasting everyone’s time. Nobody wants to sit and watch their Zoom host silently struggle to organize breakout rooms for five minutes in the middle of a meeting.
Here’s how to pre-assign participants to specific breakout rooms:
-
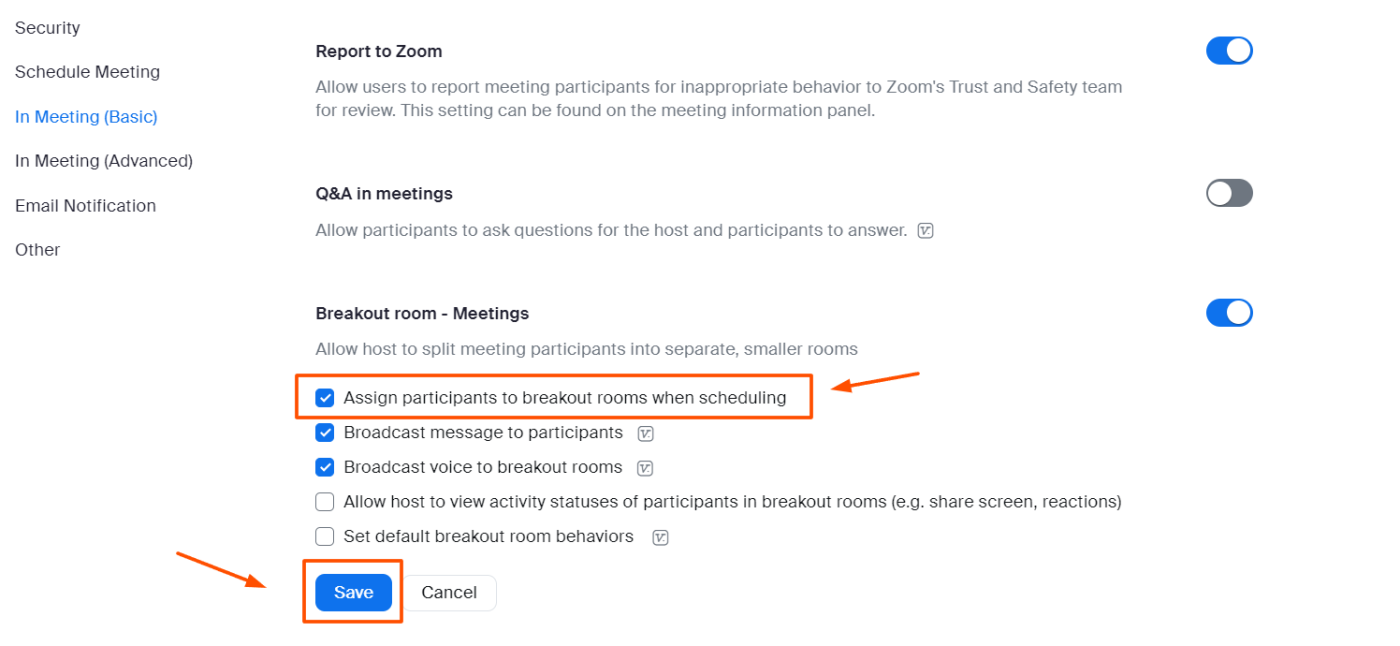
In the same In Meeting (Advanced) section of Zoom’s settings, select Assign participants to breakout rooms when scheduling, then click Save.
-
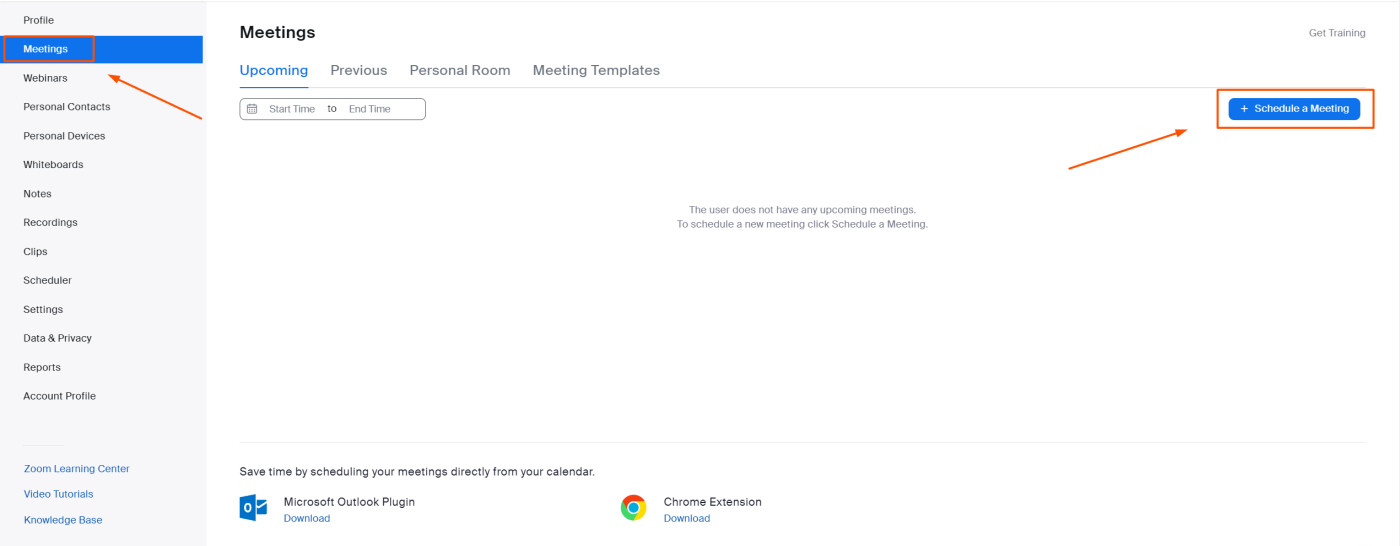
Go to Meetings in the left-side menu, and click Schedule a Meeting.
-
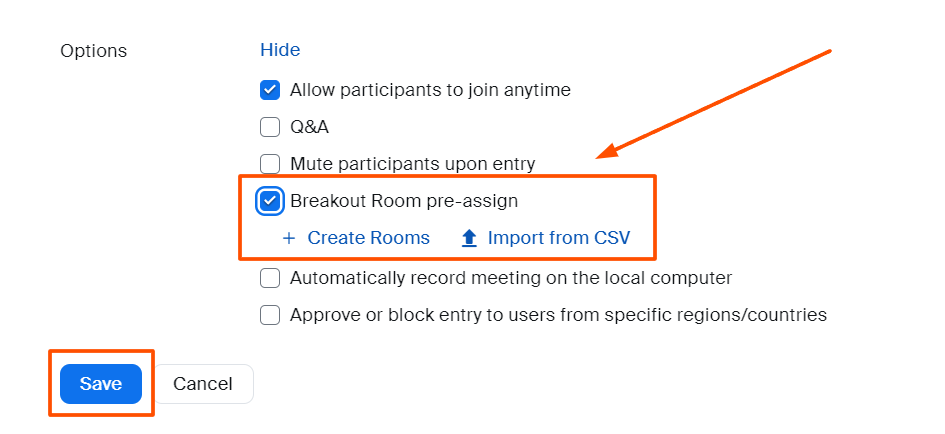
Modify your meeting preferences, then scroll down and click Show next to Options.
-
Choose Breakout Room pre-assign, then click + Create Rooms.
-
A menu will appear where you can add or remove rooms and assign participants to them. Adjust as desired, then click Save.

Step 3: Create your breakout room
If you scheduled the meeting in advance and pre-assigned participants to specific breakout rooms (AKA the right way), you don’t need to add participants during the meeting—just start your scheduled session and everyone will be added automatically.
Still, you can create, access, and manage breakout rooms once the meeting begins. Here’s how to do it:
-
As the host, start the meeting and wait for all participants to join.
-
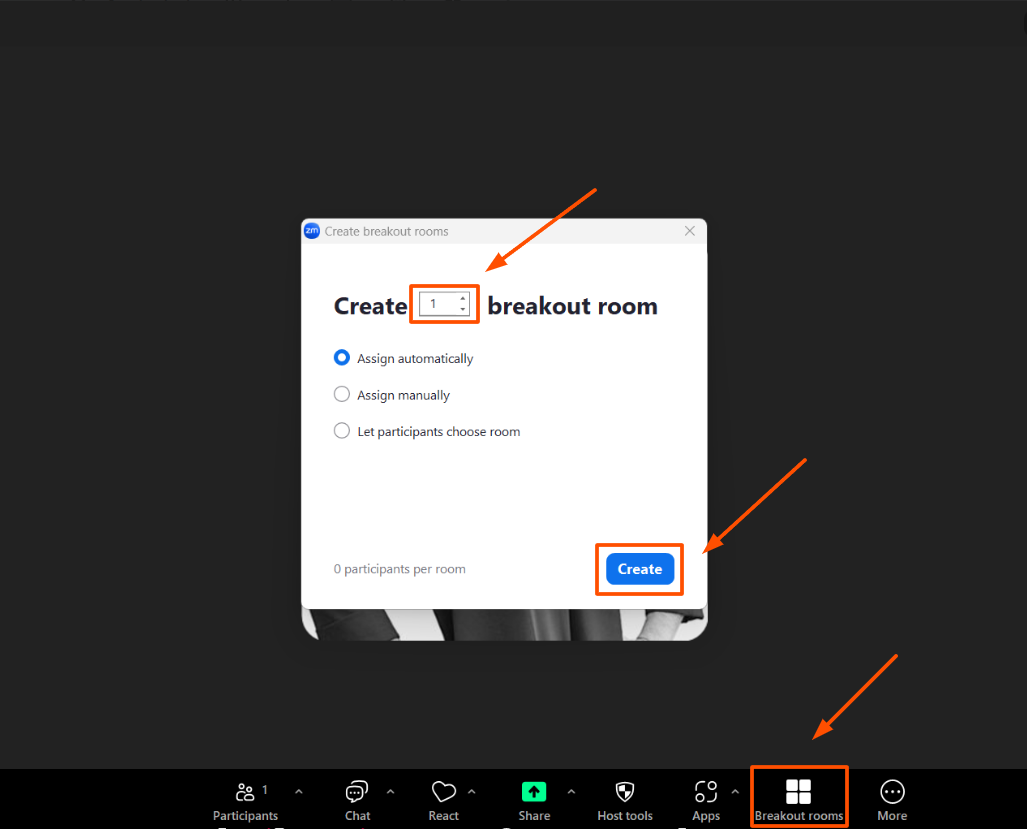
Click the More button on the bottom menu (if you don’t see the breakout rooms button), and select the Breakout Rooms option.
-
Select the number of rooms you want.
-
Choose whether you want to assign automatically, manually (more on this below), or let participants choose a room. That last option can open the door to some chaos—you’ve been warned.
Adding participants to breakout rooms manually
Forgot to pre-assign participants? Follow these steps to add people manually during the meeting:
-
In the same breakout room panel shown above, choose Assign manually. All your rooms will appear.
-
Hover over the room you want to assign a specific participant, click Assign, then mark the checkbox next to the participant’s name.
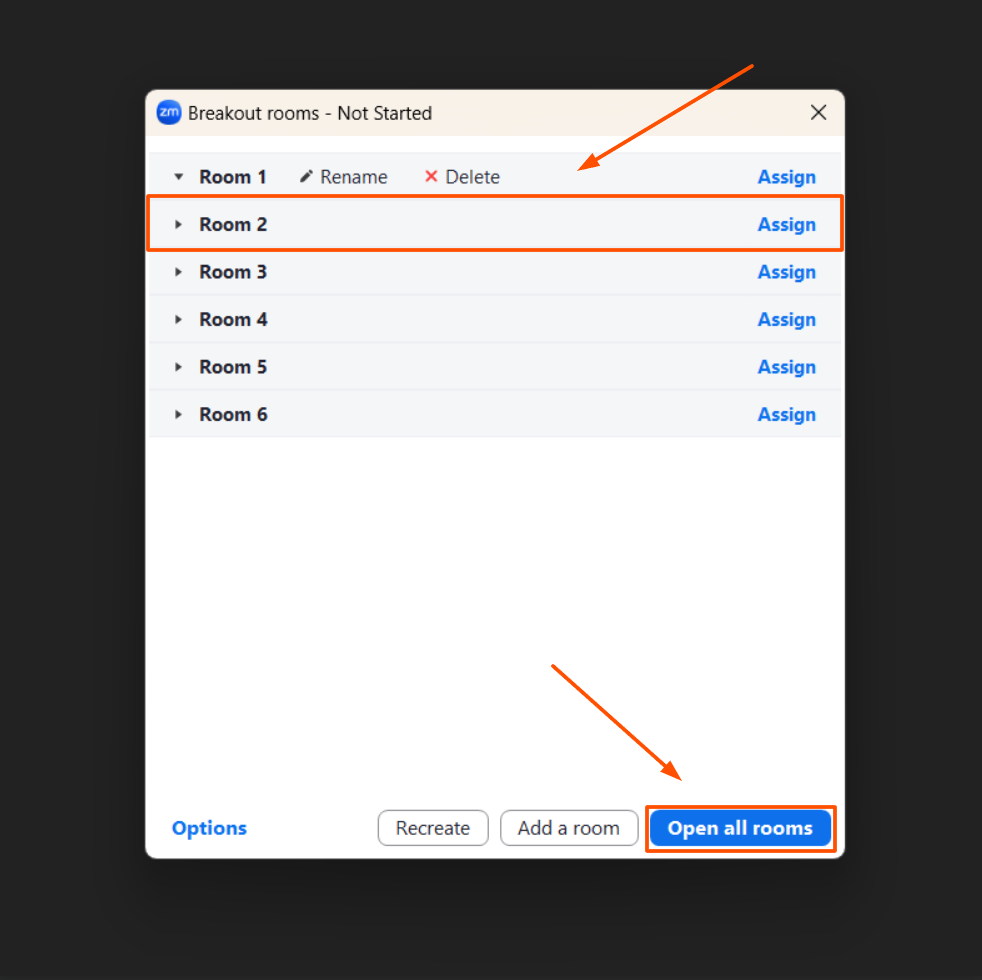
3. Once you complete the changes, click Open all rooms to start your meeting.
Managing your Zoom breakout rooms
You’ve created your breakout room—now it’s time to configure it. Here are some key features and how to use them.
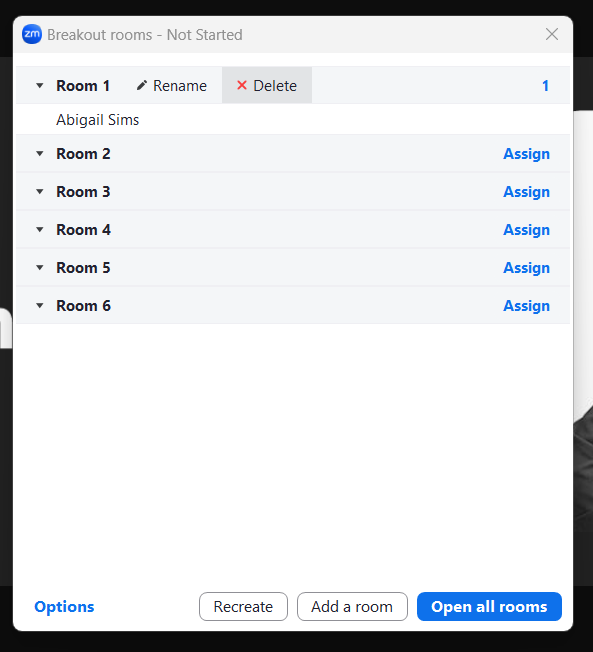
Move, rename, delete, or re-assign participants
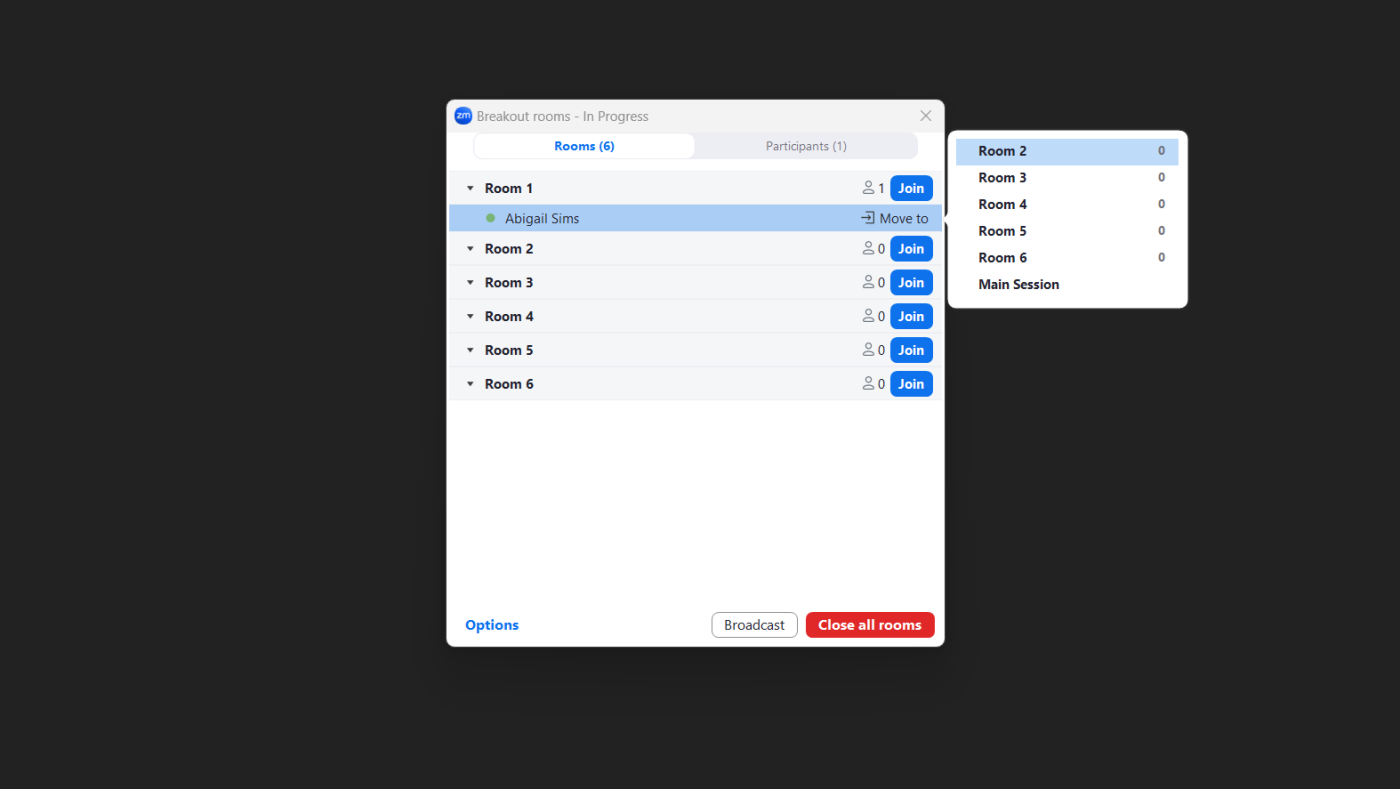
Zoom allows you to easily move participants between breakout rooms, rename the rooms to reflect their purpose, delete empty rooms, or re-assign participants from one room to another. This ensures that your breakout sessions align with your meeting’s purpose.
-
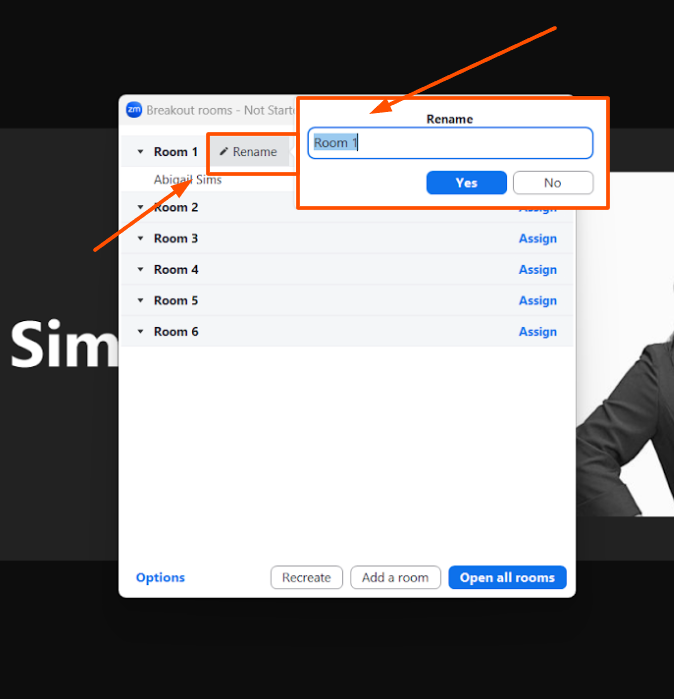
To rename breakout rooms, hover over the room name, and click on the Rename option. Enter the new name, and click Yes to save.
Adjust options
Zoom provides additional options to enhance your breakout room experience.
-
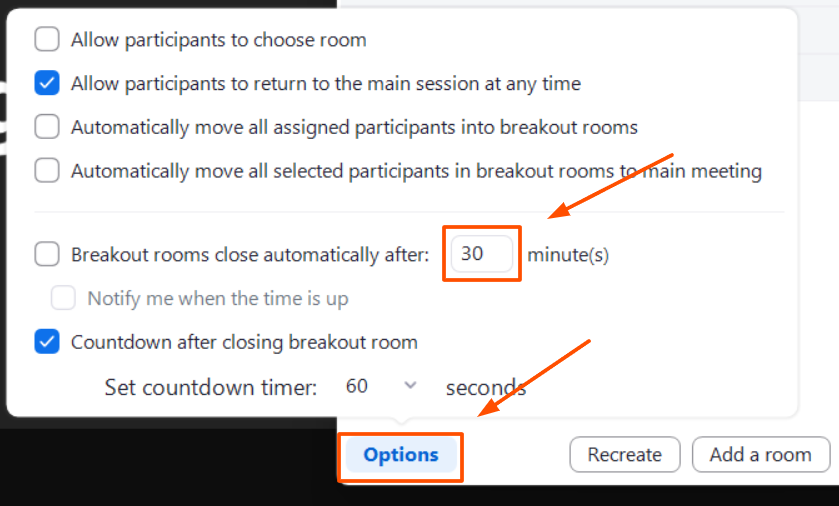
Set a time limit. To limit breakout room session duration, click the Options button on the bottom of the panel. Check the box for Breakout rooms close automatically after [provided field] minutes, then enter the desired duration.
-
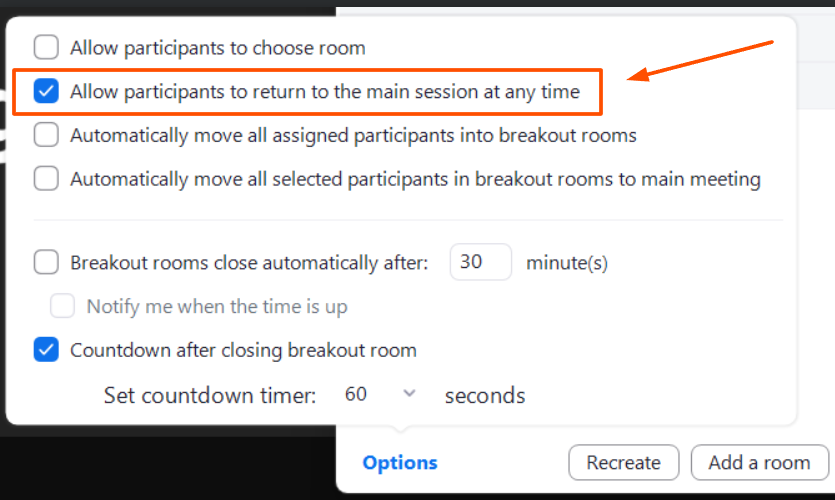
Allow participants to return to the main session. By default, participants can leave the breakout rooms and return to the main session whenever they want. To deactivate this feature, uncheck Allow participants to return to the main session at any time in the same settings panel.
-
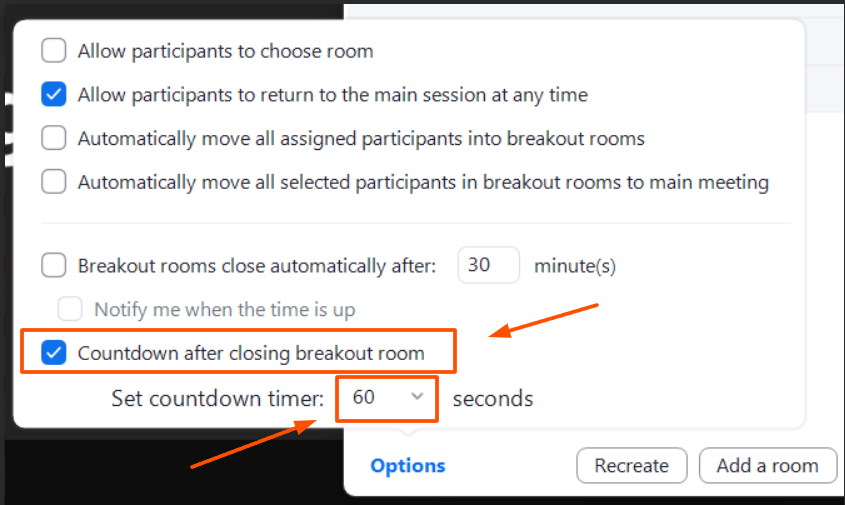
Show participants a countdown timer. To notify your participants that their rooms are about to close with a countdown timer (rather than yanking them out mid-sentence), check Countdown after closing breakout room in the same settings panel and specify how long you want the countdown to be.
Broadcast messages to all rooms
If you forgot to tell everyone what to chat about before sending them into their breakout rooms, you don’t have to awkwardly hop into every room to interrupt the convo and give verbal directions—just broadcast a message.
Click Broadcast message in the breakout room panel, and enter your message.

The message appears at the top of the participants’ Zoom client.

Monitor meeting participants
To check if people are doing what they’re supposed to be doing, here’s what you can do:
-
Open the breakout room panel with the list of rooms and assignees. The list will show each participant’s name and status, like “joined” or “waiting.”
-
To join any specific breakout room, click Join next to its name.
-
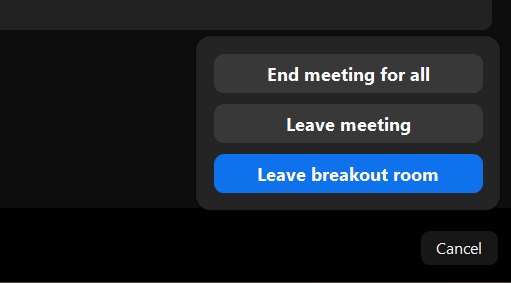
When you’re done monitoring a breakout room, return to the main meeting session by clicking the exit button at the bottom-right corner of the Zoom window. Then click Leave breakout room.
Closing rooms
When it’s time to end the breakout sessions and bring everyone back to the main meeting, you can close the breakout rooms by following these steps:
-
Open the breakout room panel.
-
Click Close all rooms.
-
A confirmation will appear. Confirm to close all breakout rooms.
How to record your Zoom meeting with breakout rooms
Recording your breakout sessions can be tricky, but it can be done. Technically, it’s only possible for the host to record the main meeting room, and none of the breakout rooms will be captured in that recording. No matter what room the host joins, the recording will only be of the main meeting room.
But you can work around that limitation by giving other attendees recording privileges. Attendees with recording permissions will be able to record their own breakout rooms locally, and those recordings can then be shared with the host. Life finds a way.
Here’s how to enable those permissions and then set up recording.
-
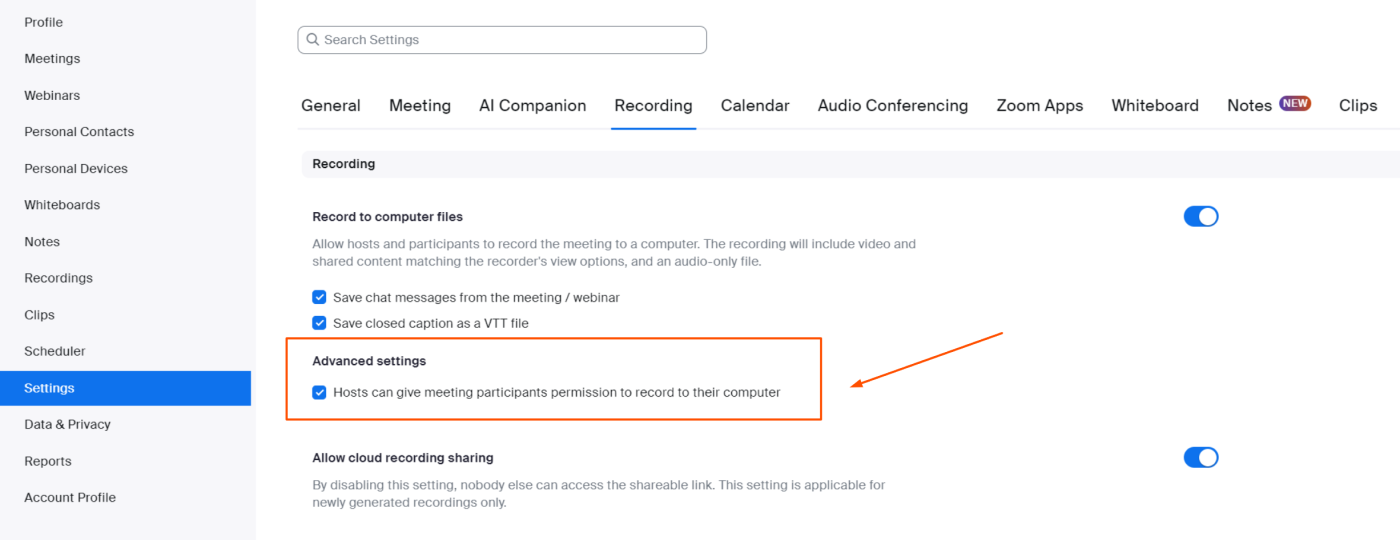
Make sure you have recording permissions enabled in Settings > Recording.
-
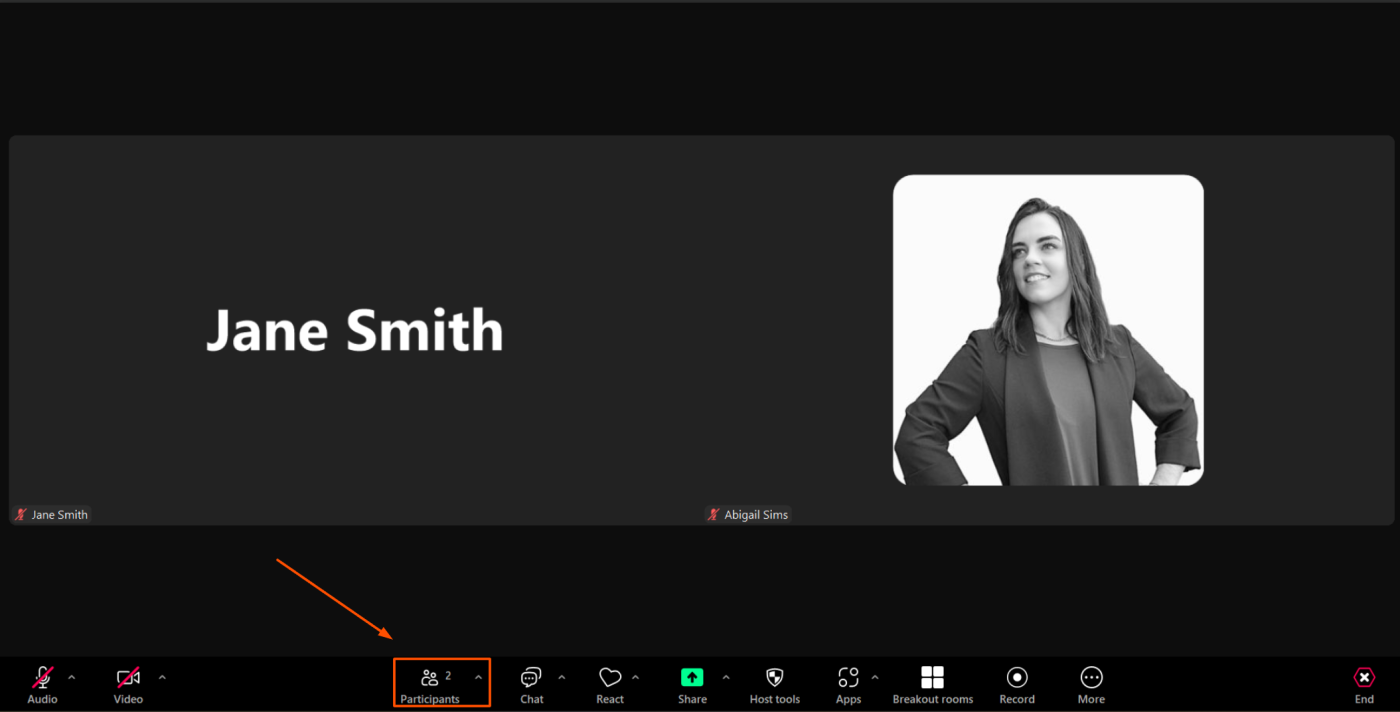
Next, as the host of your meeting, click the Participants button.
-
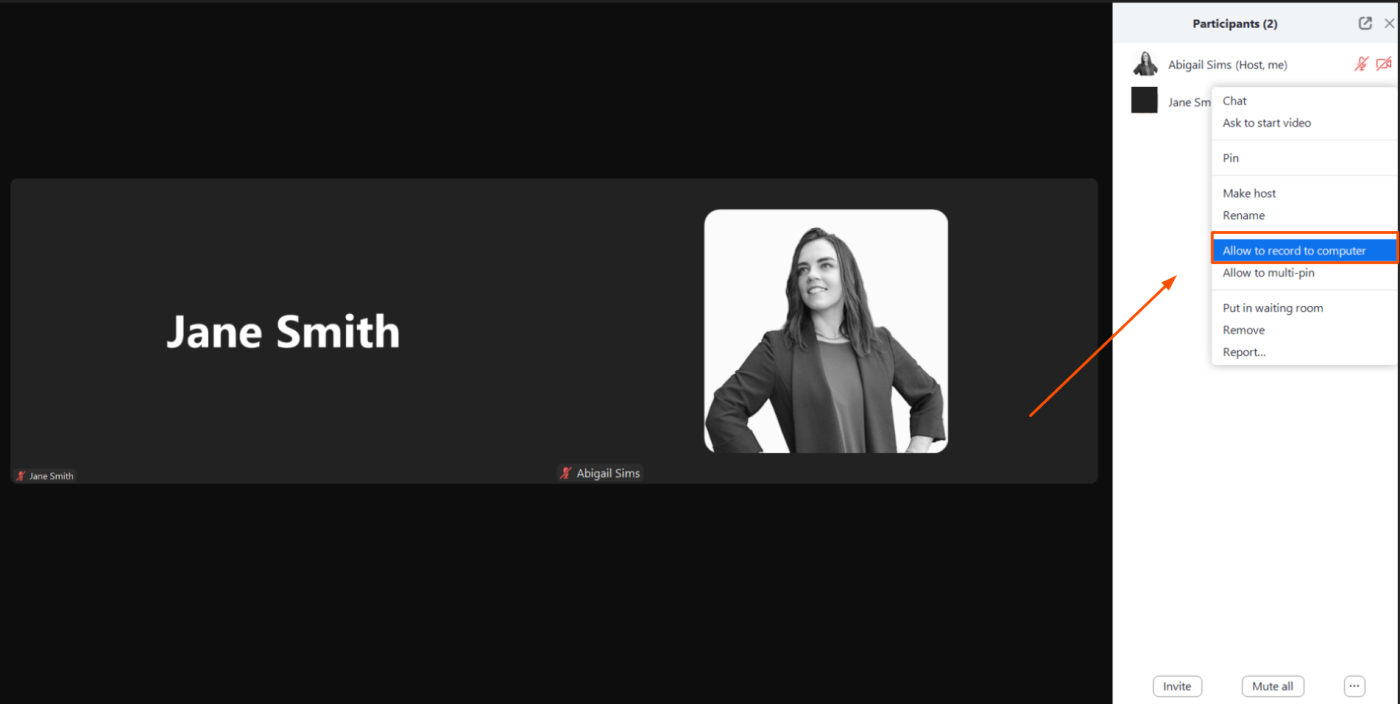
From the Participants menu, click on the participants you want to grant recording permissions to. (There’s no limit.) Within that menu, click Allow to record to computer.
-
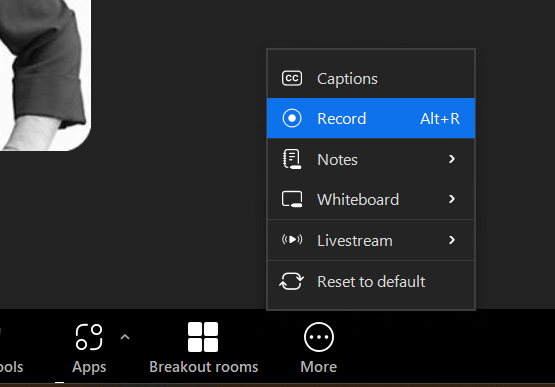
As the participant or the host, you can now select the More button from the bottom menu and click Record.
-
Your session is now being recorded, and you should see a notification in the top-right corner indicating this.

It’s not ideal, but it at least lets other people record breakout rooms while you hold down the fort in the main session.
Tips for running breakout rooms in Zoom
Check out these tips to make your breakout sessions less awkward.
-
Plan ahead. Like any other meeting, preparation is key. Tell your participants why they’re being put into a breakout session, set clear expectations, and think through all logistics in advance.
-
Diffuse discomfort. Break the ice by asking participants a fun question or prompt to kickstart their discussions. It’s a great way to get the conversation flowing, but keep it original—your guests have probably been asked, “What did you do over the weekend?” five times this week already.
-
Communicate expectations. Don’t leave participants guessing if their breakout session will last forever. Communicate how long it’ll last beforehand to help them manage their time well and avoid confusion.
-
Prepare for technical issues. Technical glitches are bound to happen. Prepare a backup plan and give participants clear instructions on what to do if they encounter a (hopefully not made-up) issue.
Automate Zoom
If you’re ready to take your scheduling workflows a step further, you can use Zapier’s Zoom integration to automatically schedule meetings and upload meeting recordings. Learn more about how to automate Zoom, or get started with one of these pre-made workflows.
Zoom breakout room FAQ
Here are some answers to common Zoom breakout room questions.
Can you make breakout rooms in Zoom’s free version?
Yes! You can create and use breakout rooms during meetings without a paid Zoom subscription.
Can you add breakout rooms in Zoom during a meeting?
Yes. While your meeting will probably (definitely) run smoother if you create your breakout rooms beforehand, there are occasions when adding participants during the meeting is necessary, like when someone who had declined the meeting messages you last minute that they want to join. Assuming you have breakout rooms enabled and your meeting has already started, invite this person and click Assign manually to add them to the desired room.
How many breakout rooms can you create at once?
It depends on which Zoom version you have available. The free plan allows up to 50 breakout rooms in a single meeting. The Pro, Business, Education, and Enterprise plans allow for 200 breakout rooms in a single meeting.
Who can see breakout room chats?
This depends on the participant’s role and the meeting host’s settings. As the host, you can see the chats happening in all breakout rooms. Participants assigned to the same breakout room can see and participate in the chat for their own room, but not other rooms.
Related reading:
This article was originally published in July 2023 by Luke Strauss and has also had contributions from Abigail Sims. The most recent update was in July 2024.