My main gig is writing marketing content, but I also wear lots of hats for an independent media criticism site called Unwinnable. I’ve been managing their social media, writing articles for them, and serving as an editor for five years now.
At Unwinnable, we use a classic-turned-modern publishing model. We have online articles, but our main operation is our magazine: a monthly PDF that you subscribe to like a print magazine. So we’re always looking for ways to make our subscribers’ experience better.
Back in 2021, we revamped our subscriber Discord server into a proper community, and I learned a lot working with the Unwinnable team to engage subscribers this way. I’d like to share what I learned—so here’s how you can create a Discord community for your brand.
1. Decide if Discord is right for your brand
Before you invest time and resources into a Discord community, make sure it’ll be a good fit for your brand. Here are some factors that affect how well Discord could work for your community versus a platform like Slack:
-
Your industry. Discord tends to suit B2C businesses better than B2B since it’s a casual platform originally meant for gamers.
-
Audience interests. Age and buyer behavior will affect your audience’s interest in using Discord. Younger, “geeky” audiences tend to use Discord more than older, less tech-familiar groups.
-
Funnel stage. Discord works well for customers near the bottom of the marketing funnel: people who already know your organization and product.
-
Message archiving. If you plan on including a knowledge base in your community, Discord lets you search all of your server’s previous messages regardless of how many you have. (Slack limits the number of previous messages that free users can see and will eventually delete old messages after a year.)
-
Audio and video capabilities. Discord’s signature feature is its voice and video chatting, which could serve some communities better than others.
-
Threading capabilities. Discord has a thread feature, but those threads eventually archive themselves. You’ll need to use Slack for permanently active threads.
At Unwinnable, we originally had a Slack community for subscribers, but we switched to Discord because it would more likely be in regular use for our audience, lots of whom are gamers.
2. Set goals
Before you build your community, give it goals that will guide your community design and moderation. Some popular goals for brand community Discords include:
Unwinnable uses Discord for the last goal: offering a community as a perk for people who subscribe to the magazine. It doubles as a selling point for potential subscribers and a reason for current subscribers to stick around.
You’ll notice that most of the reasons I listed here aren’t related to direct selling—they’re about building trust with customers.
3. Create your server and channels
With your goals in mind, you can now create your server and its channels.
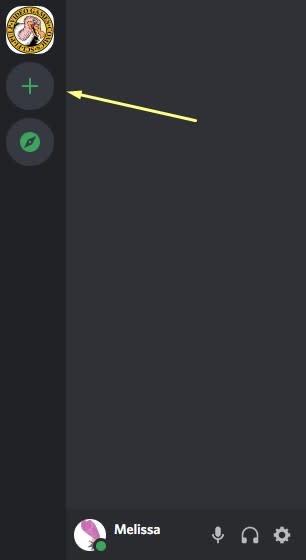
To start a new Discord server, click the plus sign beneath your server icons on the left side of your screen.
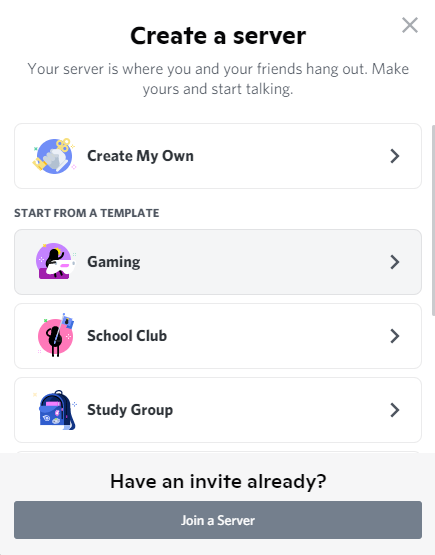
From there, you can create a server from scratch or choose a template. The templates give you a list of channels to start with that you can edit however you like.
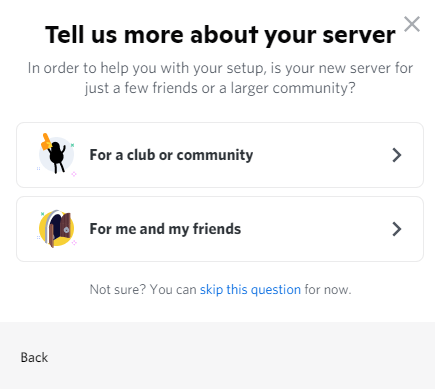
After you choose a template, Discord will ask if your server will be for a club or community or a private group. Discord isn’t very clear about how this question affects your server, so choose the community option or skip it.
Now, for the most important part: your server name and icon. Choose a name that includes your business name and an icon that matches your other brand assets, such as a logo.
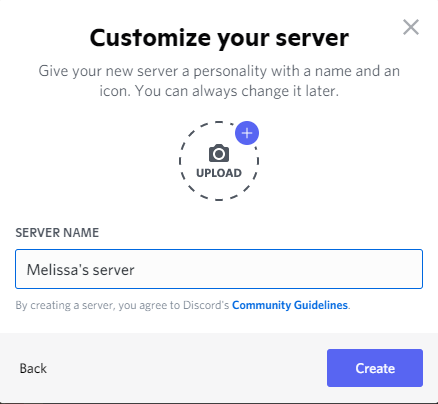
Congrats! You have a Discord server. Time to add channels.
Think of your Discord server’s channels as different places to talk about specific topics. You’ll see them to the left of your server’s messages.

Text channels let you communicate with text and photos like other messaging apps. Voice channels allow the people who enter it to talk over voice and video.
Make sure your channels tie back to the goals you set for your community. For example, if you want to build a community for your customers, you could make channels based on everyday discussion topics like pets or TV. Or maybe you want to share brand updates—make sure to give them a dedicated channel.
Since Unwinnable is a pop culture criticism site, most of our Discord discussions happen in channels dedicated to mediums like TV and games. Think about the topics you want your community members to talk about, and make channels that match.
Depending on your objectives, you can make your server a Community server with added promotion features and analytics. If you want to keep your server small and exclusive like Unwinnable, though, you might be better off with a normal server. And you can always start as a normal server and switch to community features once you get the hang of Discord.
4. Set rules and roles
Community servers have built-in rules pages that members have to read and approve before posting. Your server’s rules should help you facilitate healthy discussions and create a safe space.
Here’s what the Unwinnable Discord community’s rules look like:
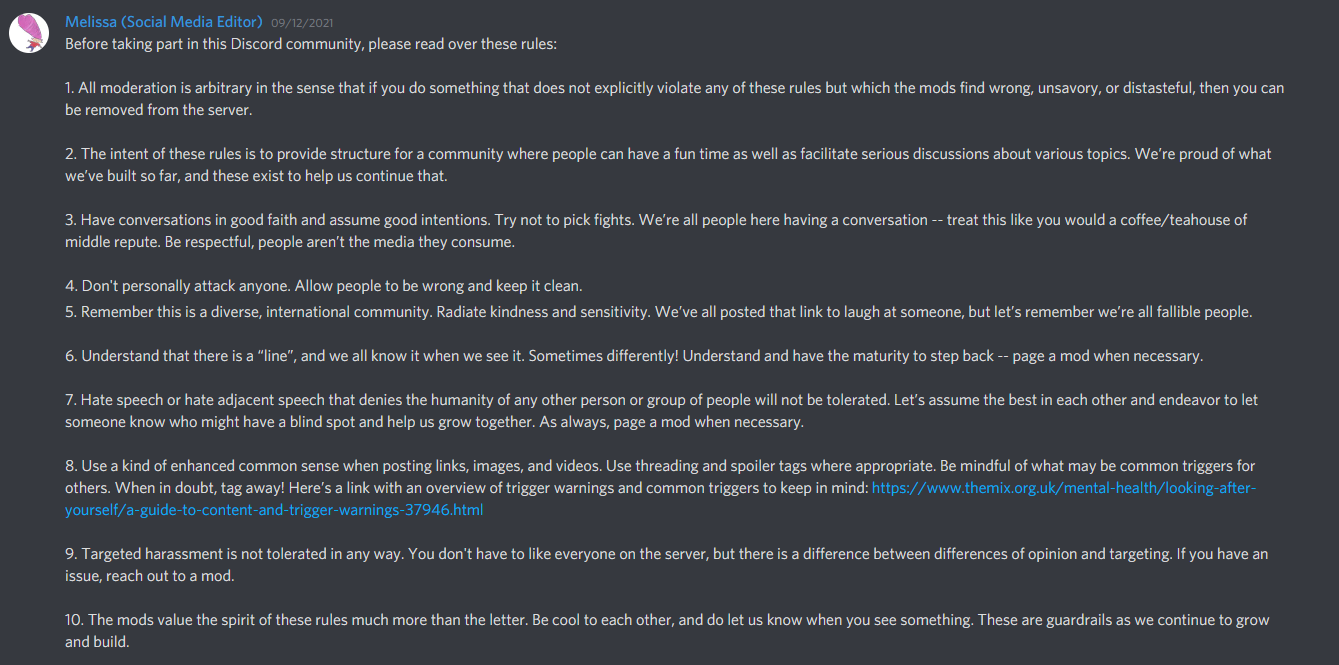
As you can see, they don’t have to be super long to do the job. Find more rule inspiration in Discord’s guide to developing rules and this quick guide on GitHub. (Shout out to Unwinnable’s editor-in-chief, David Shimomura, for writing these rules for me to post.)
Once you’ve taken care of the rules, it’s time to create Discord roles for your community members. Roles determine a member’s admin permissions, accessible channels, name color, and appearance on your server’s Online list. This Discord support article explains how role hierarchies and permissions work in detail, and it’s worth checking out as you’re getting started.
If you have a normal Discord server, you can use an automation tool like Zapier to automatically assign a role that grants access to your channels after someone reacts to your rules. Zapier can also help you set roles based on members’ interactions with other platforms to give them access to channels relevant to their interests. Read more about how to create Discord reaction roles with Zapier, or check out these example workflows.
You can also build rules screening into your community onboarding if you have a Community server. In exchange for giving you more settings to juggle, Community servers give you more options to develop a welcome experience and, of course, community.
5. Promote your server
Now that your server is ready to go, it’s time to promote it in places where potential community members will see it. If you keep your community open to the public, use your invite link to its fullest potential. To find your Discord invite link, click the arrow next to your server name in the upper-right corner, and select Invite People.
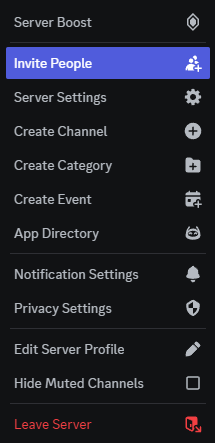
From there, you can share it anywhere potential members will see, including social media, email newsletters, and your website. Anyone who clicks on your link will be prompted to join your Discord community.
Since the Unwinnable server is aimed at subscribers, we share a link to it in every issue release email and advertise it as a perk for subscribers on the site’s subscription page.

Don’t underestimate the power of consistent reminders. Recently, a newer member of the Unwinnable Discord community said they just remembered we had a server. I asked them what reminded them, and they told me the big red “Join us on Discord!” button in their issue release email did the trick.
6. Nurture your community
A Discord server is an ongoing investment. You’ll need to stay involved in your community to keep it growing.
Assign moderators or administrators to handle any issues in your community or help members with Discord features. When your community is small, you don’t have to hire a dedicated community manager, but as it grows, you might consider moderators.
And just like in real life, you can’t expect a conversation in Discord without contributing to it. Ask your team members to take part in community discussions. You don’t always have to have profound things to say. Just have fun, like I did with this air-conditioned pet house for subscribers who had pets coping with heatwaves:

Once you get a good base of people talking in your Discord community, try running events like giveaways, polls, or get-togethers. You can schedule an event in one of your text or voice channels by clicking the arrow next to your server name and choosing Create Event.
Zapier can also take some of the load off when you’re growing a Discord community. Try connecting it to your blog or shop to send a message automatically when you have a new blog post or product. You can also have Zapier automatically greet new community members when they join.
Revise as needed
After you set up your Discord community, don’t be afraid to make changes based on member activity and server analytics. If a channel isn’t getting much activity, consider deleting or changing it. Add or modify your server rules as needed to keep your community members happy and safe.
Just make sure to update everyone whenever you adjust something. Make an announcements channel at the top of your channel list, and tag everyone when you announce a change.
And if you decide you want to start making money from your community, read more about how to set up a Discord Server Subscription or Shop.
Related reading:
This article was originally published in January 2022. The most recent update was in July 2024.