Automation doesn’t always follow the straightforward scenario of “when X happens, do this”. Sometimes, you’ll want to create separate paths that lead to different outcomes depending on certain factors, like a proverbial fork in the road.
Paths, one of Zapier’s built-in tools, can navigate these twists and turns in a single Zap. The tool allows you to split an automatic workflow into multiple branches—each with its own set of actions. It’s a choose-your-own-adventure story for your work.
Here’s how to use Paths to build automation that scales with you.
New to Zapier? It’s workflow automation software that lets you focus on what matters. Combine user interfaces, data tables, and logic with 6,000+ apps to build and automate anything you can imagine. Sign up for free.
Jump ahead
Note: Paths is only available on Professional plans and higher. If you’re on a Free plan, you can get a free 7-day trial of Paths by adding a paths step to a Zap in the editor.
What is Paths?

The Paths tool allows one Zap to perform different actions based on rules you define. Using conditional logic, these rules determine the subsequent steps: “If A happens in your trigger app, then do X. If B happens, then do Y.”
To get even more granular, each Zap with paths starts with an event (what we call a trigger) that happens in one app, like a new lead submitting their details through a form. Zapier watches for that event. Then, when it comes in, the path step checks the rules you assigned it. If those rules match a value, Zapier will then perform a task in your action app.
One path could send your highest-quality leads straight to your sales team’s inbox, for example. Another path might add the rest of your leads (who aren’t as high a priority) to an email campaign for further nurturing.
With Paths, you can automatically reply to routine messages, assign tough tickets to specific team members, or prioritize the most urgent messages depending on the details—all within one Zap. It’s just a better way to automate complex processes that require decision-making. Ultimately, instead of building multiple Zaps that carry out similar tasks, you create just one that accounts for every scenario.
Key Paths features include:
-
Flexible conditions: Set criteria based on text, numbers, dates, boolean values (true/false), and more.
-
Custom logic: Add “and” logic where data must match all of the path rules to run, or “or” logic where data must match at least one of the path rules to run.
-
Fallback rules: Create fallback paths to ensure your Zap will run even if your data doesn’t match the conditions set in any other path branch (like a typo or an empty field).
-
Paths that always run: Create paths that always perform the same action every time (like updating a project status) while still running additional actions under certain conditions.
-
Multiple path branches: Add up to 10 path branches to each path group and handle complex scenarios within a single Zap.
-
Nested paths: Create paths inside paths by adding a nested path as a step inside your steps to build workflows that cover all the possibilities.
-
Grouped and/or conditions: Easily see how your path conditions are grouped together, so you can check if you’ve set up everything correctly.
-
Drag-and-drop features: Reorder path steps horizontally to visualize paths in your preferred order without affecting how your Zap runs.
-
Expandable or collapsible path steps: Get a cleaner overview of complex Zaps (like nested path groups) to easily edit or troubleshoot Zaps without accidentally modifying the wrong path.
What you can do with Paths
When it comes to Paths, the possibilities are endless. While most use cases will depend on your unique business challenges, here are a few of our most popular examples:

Send personalized messages to subsets of customers
Engage your customers by sending personalized messages whenever their status changes in your CRM. Create custom rules to determine the exact conditions under which those messages are sent.
What this might look like:
-
A customer’s status changes in your CRM.
-
In Path A, use a rule that says if the text exactly matches a value (like “new customer”), send a personalized welcome message. In Path B, use a rule that says if the text exactly matches “inactive,” send a re-engagement message.
Route qualified leads to the right channel
If you’re collecting leads in a form, give your most qualified prospects the white glove treatment by routing them to your sales team’s inbox and adding the rest to an email campaign.
What this might look like:
-
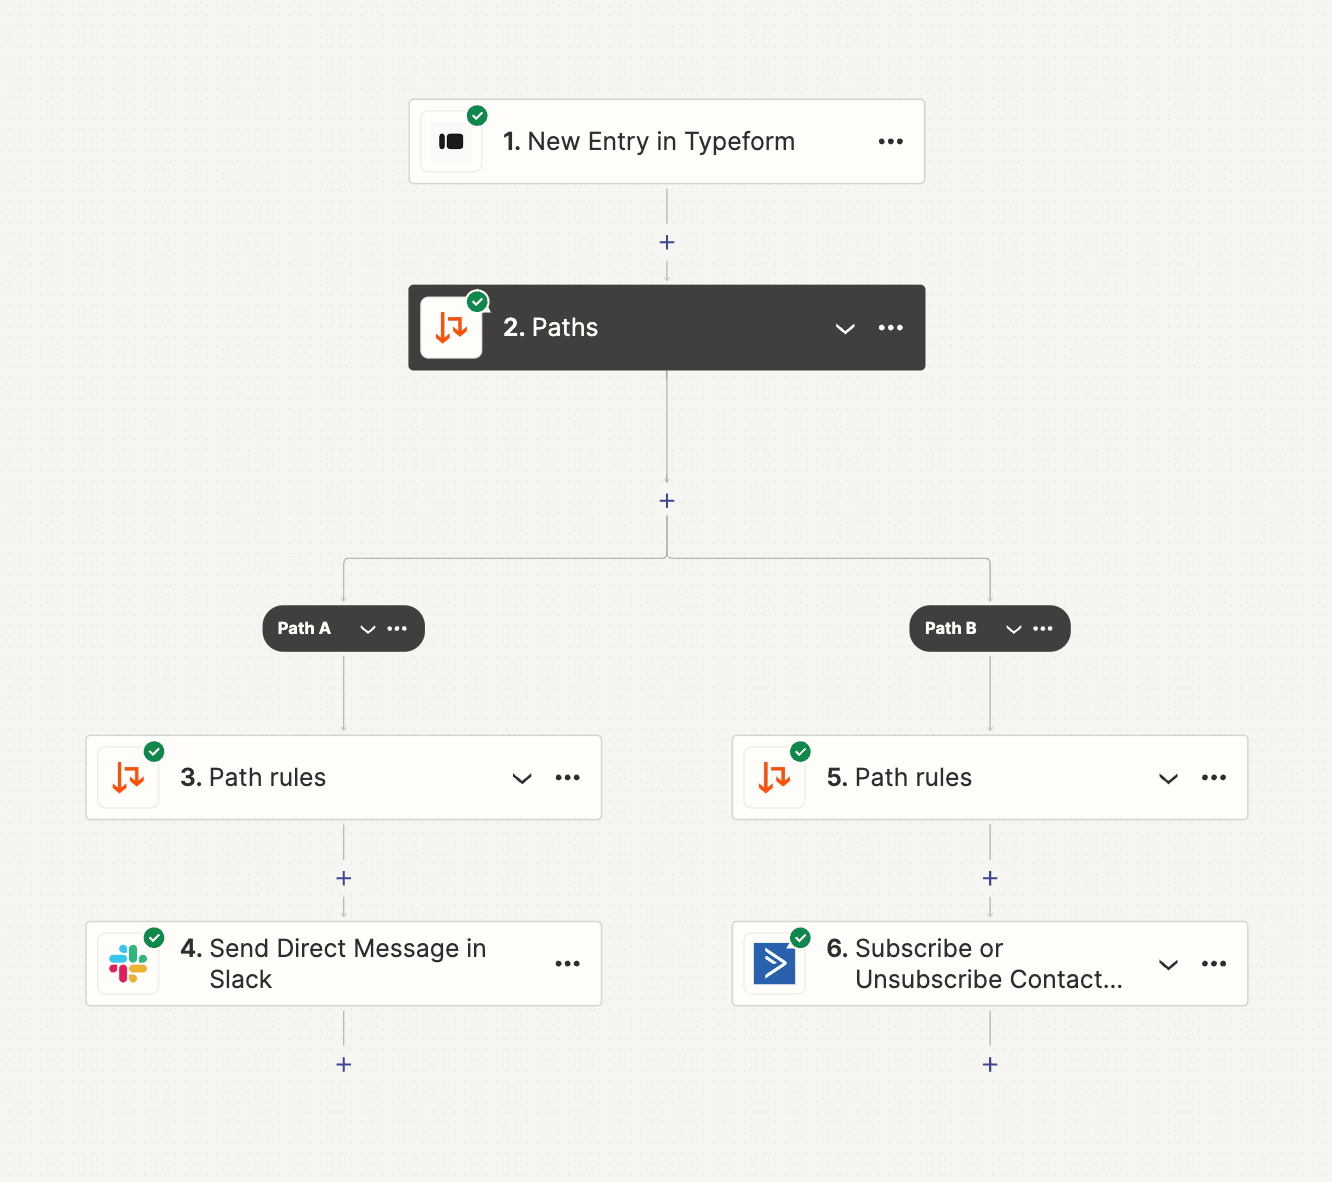
A prospect fills out a form in Typeform.
-
In Path A, use a rule that says if the subscription field in your form exactly matches “Enterprise,” send their information to your sales channel in Slack. In Path B, use a rule that says if the subscription field in your form doesn’t exactly match “Enterprise,” add them to an email campaign in ActiveCampaign.
Streamline your customer support
Speed up your response times by assigning new tickets to different teams based on priority or urgency. High-priority tickets can be assigned to your premier support team, while lower-priority issues can be routed to a general support queue.
What this might look like:
-
A customer submits a support ticket about a product issue they’re encountering.
-
In Path A, use a rule that says if the issue type is selected as “service outage” or “billing error,” assign it to your premier support team in Slack. In Path B, use a rule that says if the issue type is selected as “general enquiry” or “feature request,” route it to the general support queue.
-
Add a fallback rule so that if the conditions in your paths aren’t met, a new path will route all tickets to the support queue—even if someone makes a typo or forgets to select a dropdown answer for the ticket.
Manage multiple aspects of project management
Create a system that always updates projects based on specific tags by setting a path branch without rules. If a project gets updated, other paths can notify team members, assign tasks, and manage time in your calendar.
What this might look like:
-
A new project is added to a project management tool with a specific tag.
-
Add an “always run” path so that your Zap updates the project status regardless of whether the other paths you’ve set up run.
-
Add additional rules (Paths A through C) that notify teammates depending on the project status, assign individual tasks, and block off time in calendars.
How to get started with Paths
Want to see it in action?
1. Once logged into Zapier, head over to the Zap editor.
2. In the Zap editor, search for and select your trigger app. Connect your account, set up the trigger step, and test the trigger.
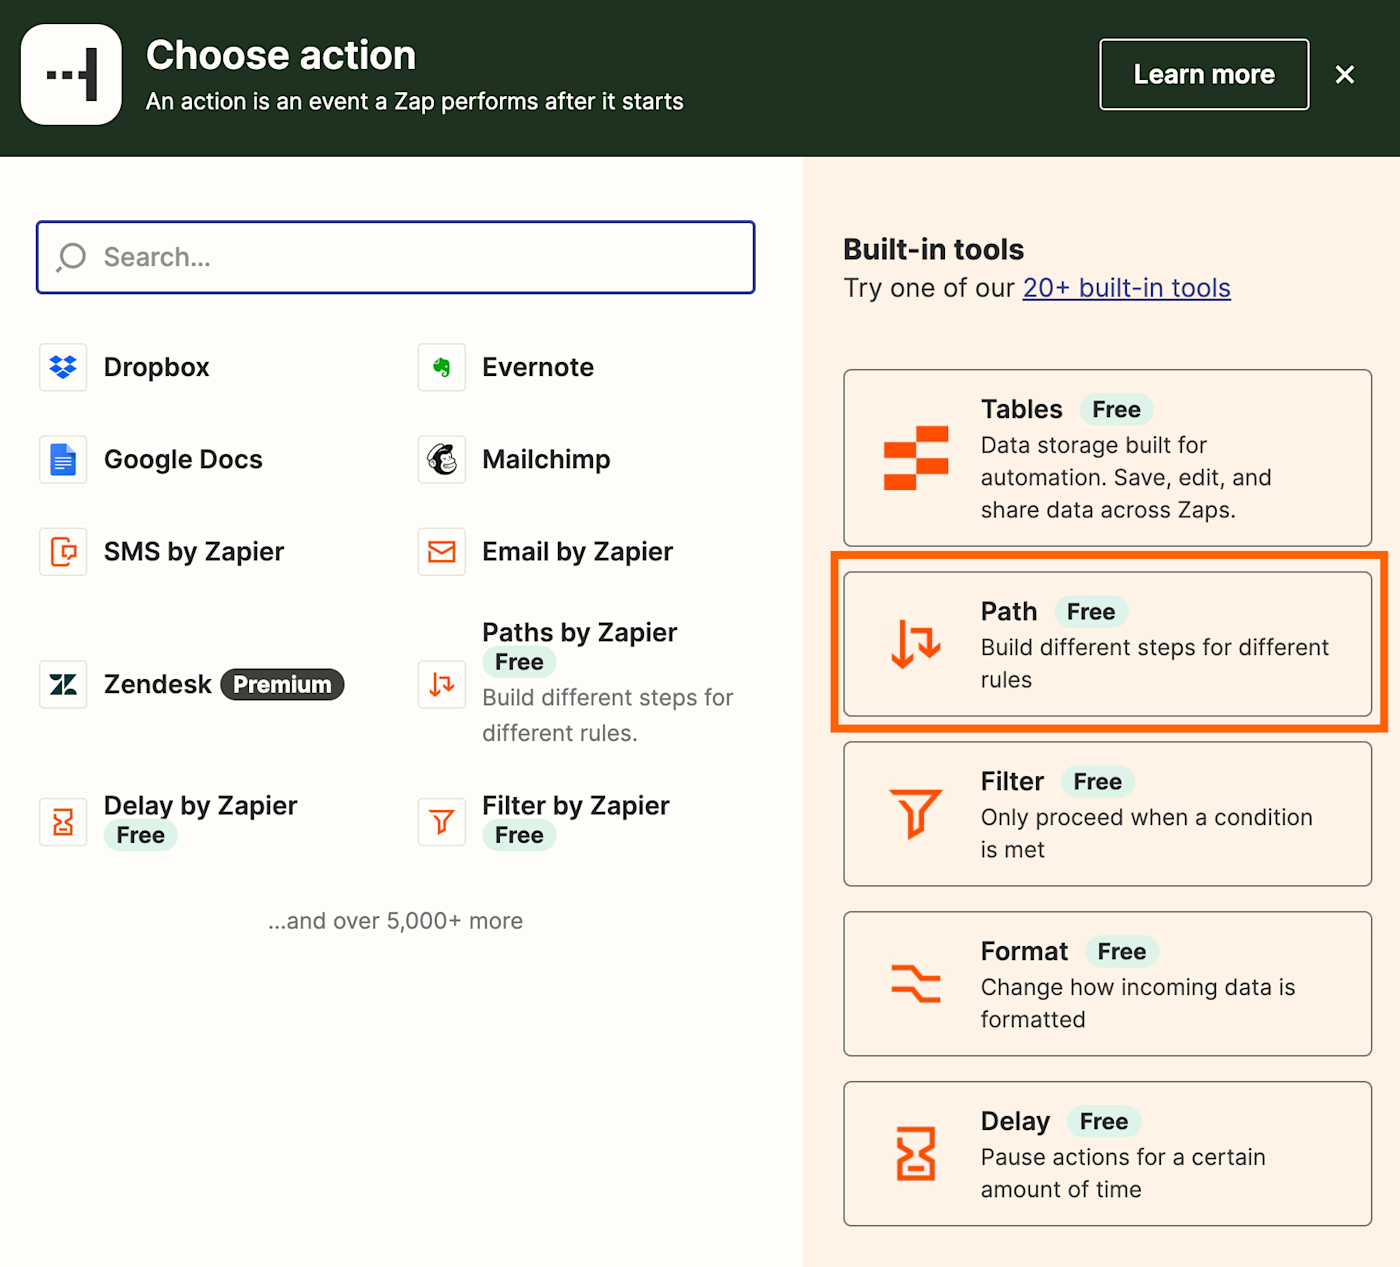
3. Next, add an action to your Zap, and select Paths by Zapier in the search bar or Path from the built-in tools menu on the right-hand side.

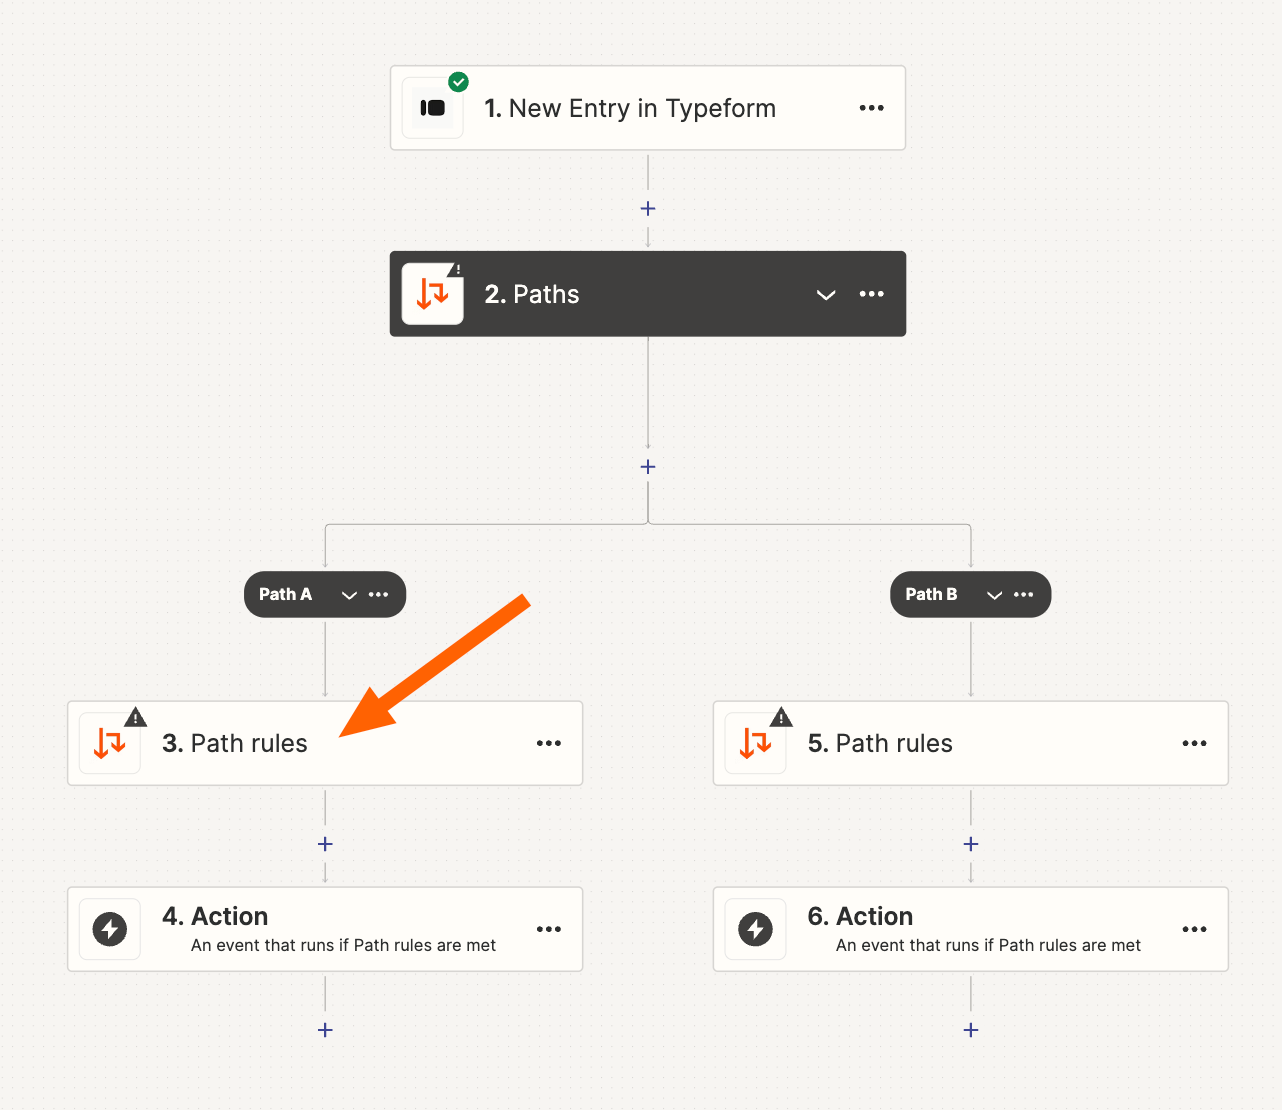
4. Two path branches, “Path A” and “Path B,” will automatically be created in a single path group.
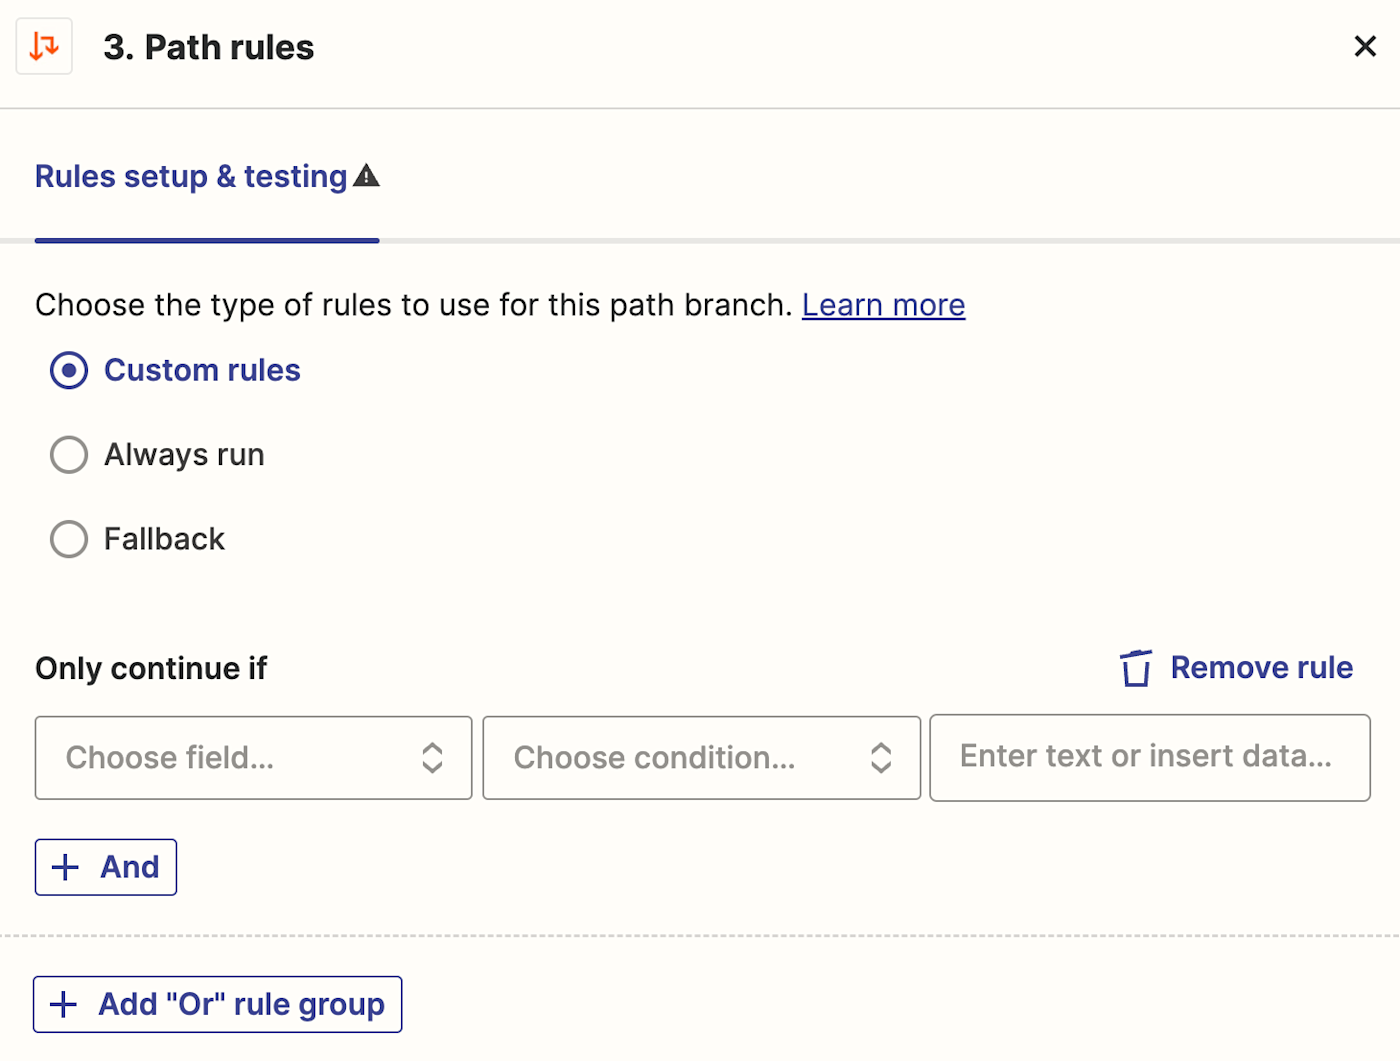
5. Click Path rules. The right sidebar will open to the Rules setup & testing tab.

6. Select the type of rule you want to use for your path branch. You can choose Custom rules, Always run, and Fallback.

7. If you select Custom rules, you’ll need to select a field from your trigger step to be checked. Next, select the condition for the field in the second dropdown menu. Finally, enter the value the rule must meet.

8. Click Continue to test your path rule(s).
9. Now it’s time to add actions to your paths. Add actions to your path the same way you would add actions to your Zap. You must add at least one action to each path branch. Click into the action step and select your app name and event. Then connect your account, set up the action, and test the action.
10. Once you’ve finished adding your paths and actions to your Zap, remember to test and turn it on.
For more information on setting up paths in your Zap, check out our help guide for step-by-step instructions.
Use Paths to add logic to your business processes
With Paths, you can visualize and manage complex processes from within a single Zap. By adding conditional logic to your workflows, you can tailor actions to specific criteria and ensure that the right steps are always taken.
That’s great news for your business, particularly when it comes to scaling decision-making.
This article was originally published in 2018, written by Matthew Guay. It was most recently updated in May 2024 by Elena Alston.