I teach virtually for a local college, and like every educator ever, I have a serious problem with student no-shows for meetings.
After much reflection (me literally looking at my reflection in an empty Zoom room groaning, “Whyyy?”), I’ve found a promising solution: appointment scheduling software. While there are plenty of meeting schedulers to choose from, I’m a creature of habit and prefer to do everything in Google.
If you also like to dip one pinky toe into the unfamiliar while staying firmly planted in your comfort zone, follow along. I’ll walk through how to create a booking page using the Google Calendar appointment schedule feature.
Here’s what we’ll cover:
What’s the difference between Google Calendar appointment slots and appointment schedules?
Before we get started, it’s worth clarifying that despite the similar-sounding names, Google Calendar appointment slots and appointment schedule are different features.
Appointment slots is much more limited: only individuals with Google Workspace accounts can book appointments with each other. It’s also being replaced by appointment schedules—and for good reason. With appointment schedules, you can:
-
Share a professional booking page. Anyone with an email address can book an appointment with you using the appointment schedule’s booking page. And you can easily view your booked appointments alongside your regular schedule in Google Calendar. (Appointment slots, on the other hand, only allowed individuals with Google Workspace accounts to book appointments with each other.)
-
Customize your appointment availability. This way, you can do things like add buffer time between meetings, set a maximum number of bookings each day, and limit how early (or last-minute) someone can book an appointment.
-
Get email notifications. You’ll receive a booking confirmation, and anyone who books will receive an automatic reminder email before the appointment.
Note: The appointment schedules feature is currently available on work and student Google accounts but not Google Workspace Business Starter accounts.
How to create an appointment schedule in Google Calendar
Creating a Google Calendar appointment schedule is as straightforward as creating a calendar event—only with more customization options. It has a lot of features that meeting schedulers like Calendly have but with that familiar Google feel.
-
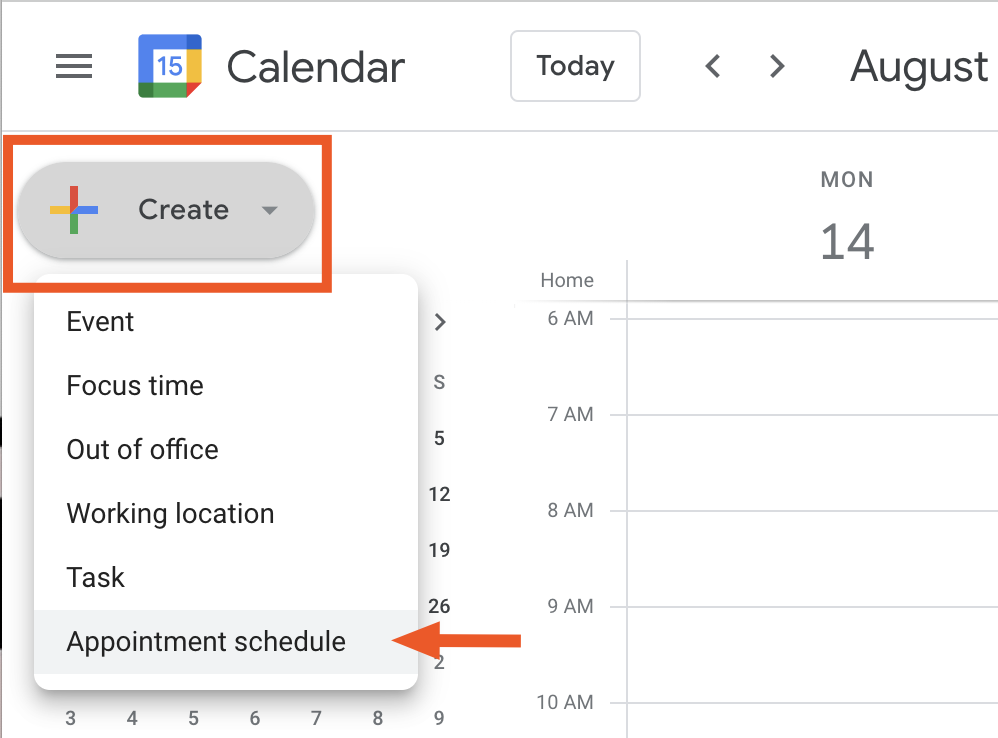
With Google Calendar open, click Create, and then click Appointment schedule.
-
In the appointment schedule panel that appears, update the following sections:
-
Add title. This title is visible to anyone who has a link to your booking page. By default, Google Calendar will also use the title as the event name when someone books an appointment slot.
-
Appointment duration. Each appointment slot must last for at least 5 minutes. To change the duration, click the down arrow (
▼)beside the default duration. -
General availability. For every day of the week, set the times that you’re open to meet. To include multiple availabilities in a day, click the Add another period to this day icon, which looks like a plus sign (
+). And if you want to copy the appointment slots from one day across all your other available days, click the Copy to all icon, which looks like a rectangle. Note: Copied appointment slots won’t override any days marked Unavailable. -
Calendars checked for availability. Google Calendar will automatically block off busy times from your selected calendar on your booking page. By default, it’ll only check your primary calendar. If you want Google Calendar to consider other connected calendars, indicate them here.
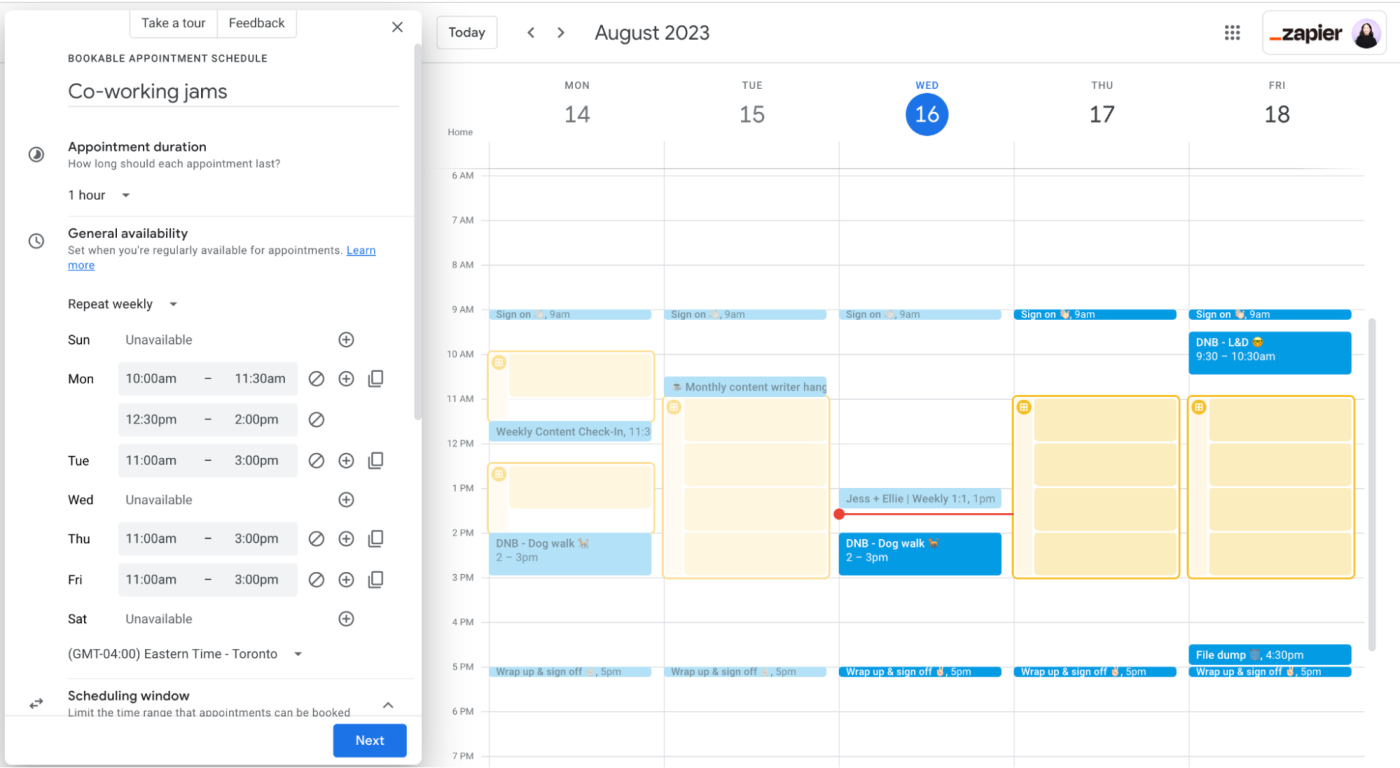
As you progress further down the panel, you’ll find more advanced features that you can customize, like a scheduling window, adjusted availability for specific dates, and buffer times between bookings.
-
-
Click Next.
-
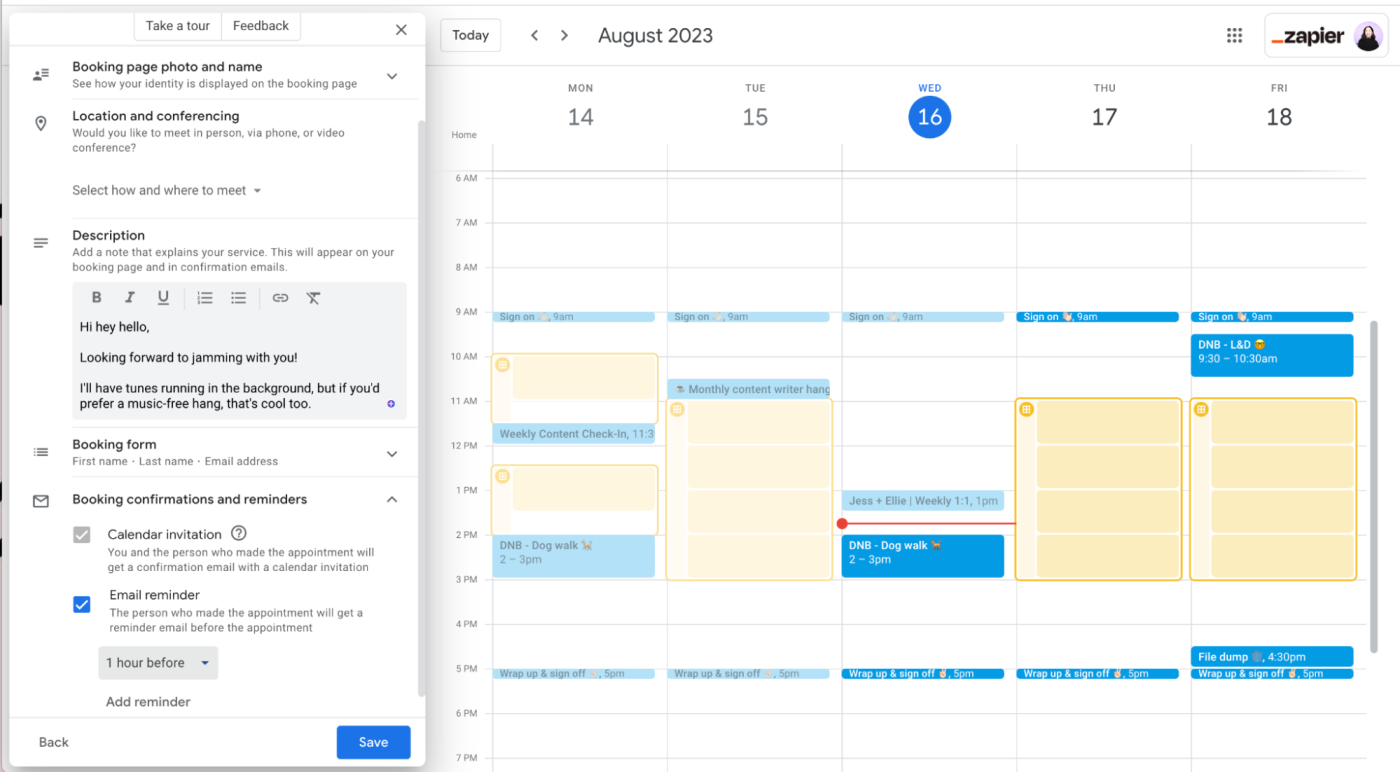
Now it’s time to set up your booking page. In the appointment schedule panel, you can customize what people see when they view your booking page, along with booking confirmations and reminders. Unlike Google Calendar events, you can’t set the default video conferencing to Zoom (much to my chagrin).
-
Click Save.
How to edit an appointment schedule in Google Calendar
Here’s the easiest way to edit the details of your appointment schedule in Google Calendar.
-
Click any appointment schedule block in your calendar grid.
-
In the appointment schedule window that appears, click the Edit appointment schedule icon, which looks like a pencil.
-
Edit the details of your appointment schedule.
-
Click Next.
-
Edit the details of your booking page, if needed.
-
Click Save.
Need to delete your appointment schedule altogether?
-
Click the appointment schedule block that you want to delete in your calendar grid.
-
In the appointment schedule window that appears, click the Delete appointment schedule icon, which looks like a garbage can.
-
Select if you want to delete only that week’s availability or the entire appointment schedule, and then click OK.
How to share your Google Calendar appointment schedule
Now that you’ve created your booking page, it’s time to share it. Google Calendar lets you do this in a few ways: share a link to your booking page or embed it on your website.
How to share a link to your Google Calendar booking page
If you prefer to manually share your booking page, here’s how to get the share link.
-
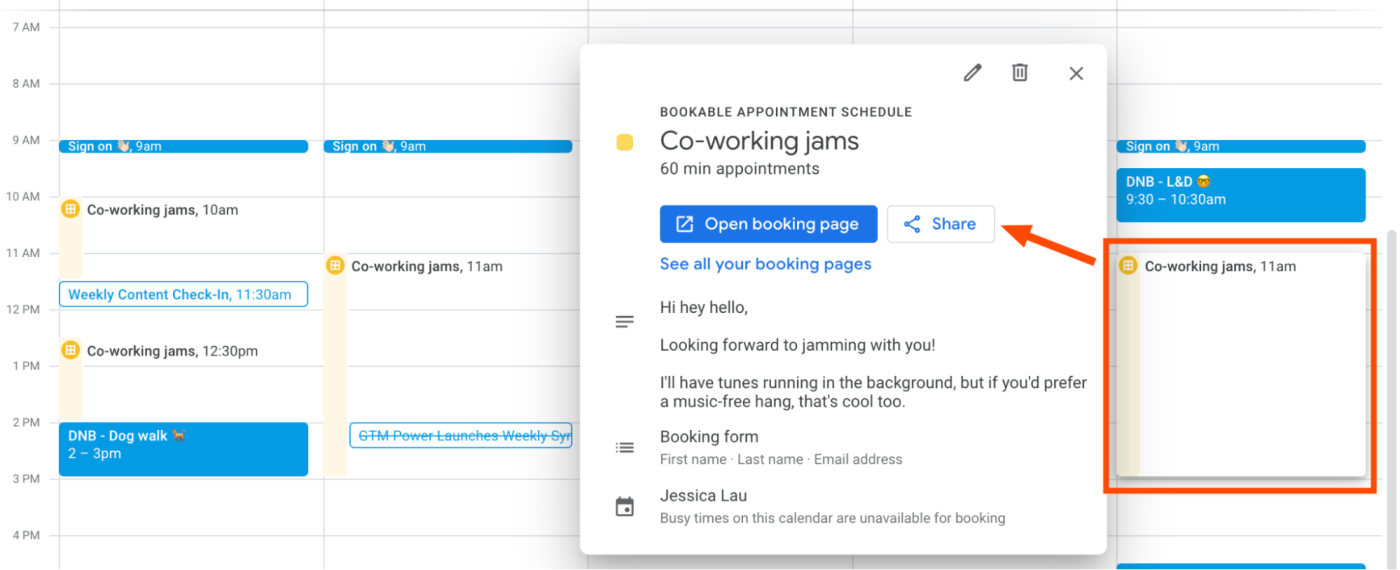
On your Google Calendar grid, click any appointment schedule block.
-
In the appointment schedule window that appears, click Share.
-
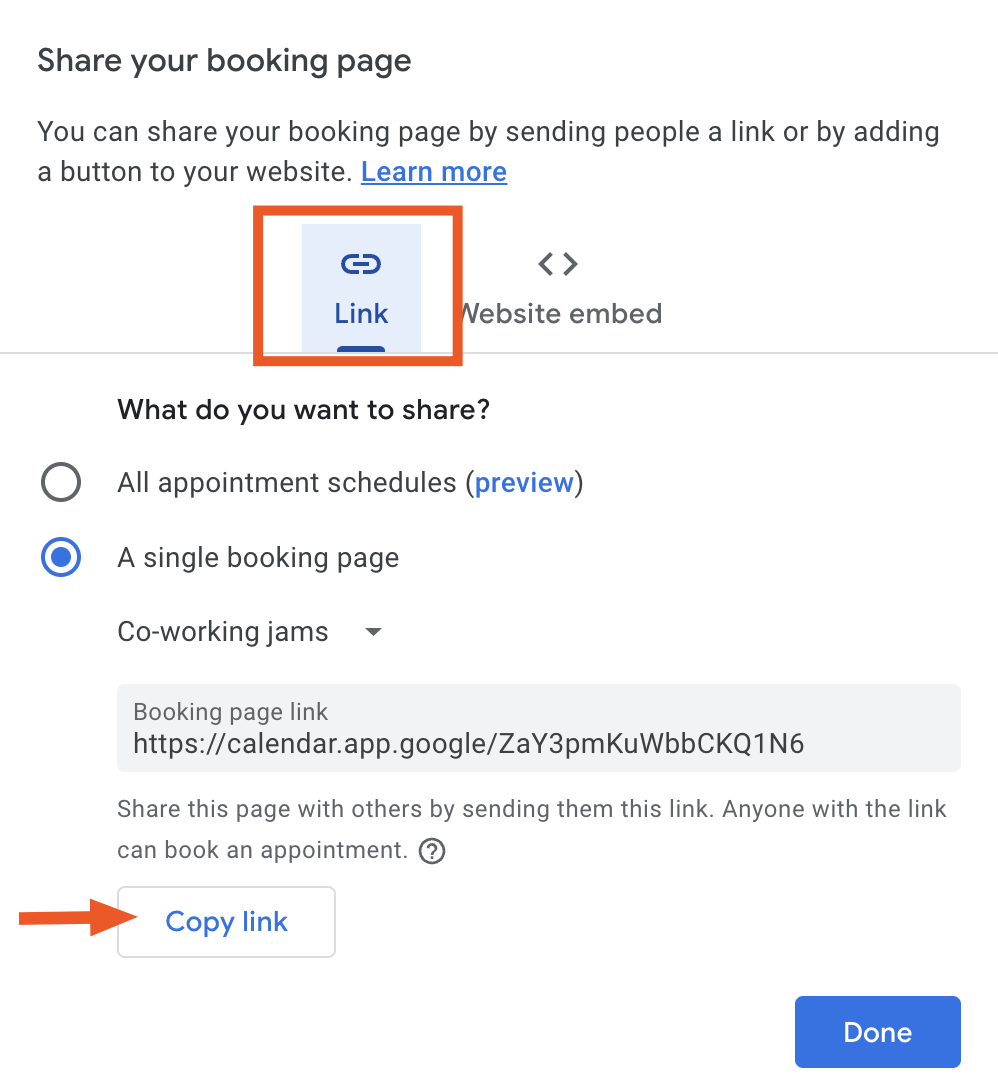
In the Link tab of the Share your booking page window that appears, click Copy link.
-
Click Done.
-
Paste the link wherever you want to share your appointment schedule.
How to add your Google Calendar booking page to your website
If the words “embed” and “HTML” don’t scare you, there’s also the option to add your booking page to your professional website. Google Calendar lets you do this in two ways: add a button that opens a pop-up with your booking page or embed the booking page directly to your site.
-
On your Google Calendar grid, click any appointment schedule block.
-
In the appointment schedule window that appears, click Share.
-
In the Share your booking page window that appears, click Website embed.
-
Click the down caret (
⋁) beside the embed option you want, and then click Copy code. If you choose Button with popup, you can also modify the button color and text.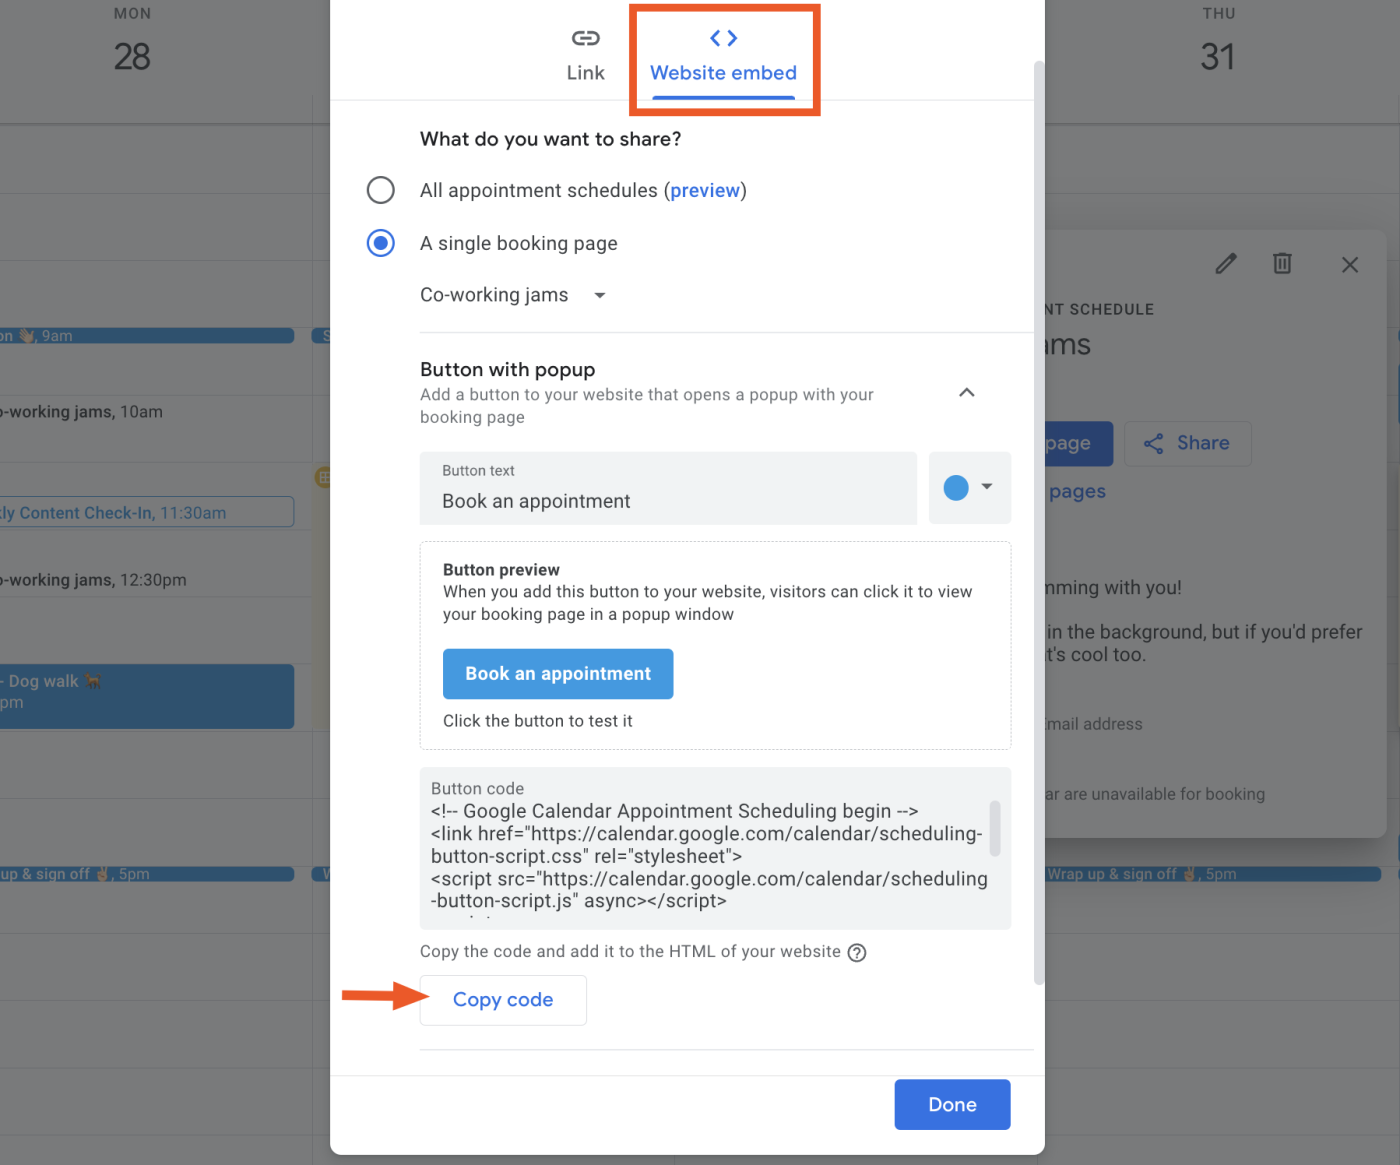
-
Click Done.
-
Paste the embed code, and add it to the HTML of your website.
Bonus: How to use the Google Calendar scheduling feature in Gmail
Google recently integrated Google Calendar appointment schedules with Gmail. This means you can now share your availability and have recipients book a meeting with you directly from your respective inboxes.
How to find a time to meet in Gmail
If you don’t have access to your recipient’s calendar, you can share your availability and let them book a meeting with you.
-
In Gmail, click Compose.
-
Draft your email as you normally would (add a recipient, subject line, and message).
-
Click the Set up a time to meet icon, which looks like a calendar, and then select Offer times you’re free.

-
Your Google Calendar will open in a panel beside your draft message. Update the meeting duration and your availability, and click Next.

-
Review your meeting details, and update the event title, location, and description if you want. When you’re done, click Add to email.

-
Your proposed meeting times will appear in your email draft. Review your email, and then click Send.

Your recipient will be able to pick a time directly from their inbox, and then Google will schedule the meeting on both of your calendars.
How to schedule a meeting from Gmail
If you have access to your recipient’s Google Calendar, you can skip straight to creating an event from Gmail. From a draft message in Gmail, click the Set up a time to meet icon, and then select Create an event.
Once you create and save your event, Google will send the event details in a separate email to your recipient, add the event to your calendars, and include the details in your draft email message.

Automate Google Calendar
Once you’ve set up a Google Calendar booking page, use Zapier to connect Google Calendar to thousands of your other go-to apps. This way, you can automatically do things like share notifications about new appointment bookings in your team chat app and create a meeting agenda in Google Docs.
Here are a few workflows to get you started.
To get started with a Zap template—what we call our pre-made workflows—just click on the button. It only takes a few minutes to set up. You can read more about setting up Zaps here.
Hey, Google. Add Zoom.
Don’t get me wrong—the Google Calendar appointment schedule offers a lot of useful features that will drastically reduce the hassle of organizing a meeting. But there’s still one downside for me: the inability to add Zoom as the default conferencing option, which was originally offered with appointment slots. But who knows? Maybe Google will add it back as an option in the near future.
Related reading:
This article was originally published in August 2022. The most recent update was in April 2024.